

Series Overview & ToC | Previous Article | Next Article
In the previous article we looked at the example Drupal 7 site that will be migrated throughout this series. Today, we will start to interact with the Drupal 10 destination site. First, we will cover configuration that needs to be in place for the migration to work. Then, we will demonstrate how to perform an automated migration from the admin user interface.
Most of the information presented below is for reference only. The goal of this series is to teach you how to perform a custom migration, but there are still valuable lessons to learn from following the automated approach. Let’s get started.
Migration related settings
The example repository includes a fully working Drupal 7 site as covered in the previous article. While it is very useful to have a local copy of the source site, it is technically not required. The only hard requirement to perform the migration is having access to the Drupal 7 database.
In our Drupal 10 site, we need to provide a new database connection pointing to the source we will be migrating from. This is normally done in settings.php or in a file included from it. In our example project, we have included the second database configuration in settings.ddev.php:
$databases['migrate']['default']['database'] = "db";

$databases['migrate']['default']['username'] = "db";

$databases['migrate']['default']['password'] = "db";

$databases['migrate']['default']['host'] = "ddev-migration-drupal7-db";

$databases['migrate']['default']['port'] = 3306;

$databases['migrate']['default']['driver'] = "mysql";
This establishes the migrate database connection. Refer to the official documentation on database configuration to learn more.
In our case, it is relevant to point out that from our Drupal 10 DDEV project we are connecting to the default database of the Drupal 7 DDEV project.
Alternatively, we could import a second database into the Drupal 10 DDEV project. Review this article to learn how to include extra databases in a single DDEV project. If you decide to do this, or use a different tool for local development, update the above connection settings accordingly. You could point the connection to a remote database if that is preferred or required.
To verify that the connection works, run this command in Drupal 10:
ddev drush sql:connect --database migrate
The output should be:
mysql --user=db --password=db --database=db --host=ddev-migration-drupal7-db --port=3306 -A
Another setting that should be considered before starting the migration is migrate_node_migrate_type_classic. This will determine how node migrations will be handled.
When set to FALSE a single migration will be generated for each content type. It will take care of importing the current revision, all past revisions, and all translations for the nodes. This is default behavior and it is referred to as the complete node migration approach.
When set to TRUE three different migrations will be generated for each content type: one for the current revision, one for past revisions, and one for the translations. Drupal sets this setting to FALSE by default.
In the previous article we mentioned that we will not be migrating revisions for any entity. Therefore, our example project overrides the default in settings.migrate.php:
$settings['migrate_node_migrate_type_classic'] = TRUE;
Later in this article, we will run the automated migration via the user interface provided by Core’s Migrate Drupal UI module. One of the steps of the form wizard requires indicating what version of Drupal we are migrating from, the database credentials, and the location of user uploaded files. As an alternative to entering this information manually in the browser, we can provide it via a group of four settings. In our example, they are defined in settings.migrate.php:
$settings['migrate_source_version'] = '7';

$settings['migrate_source_connection'] = 'migrate';

$settings['migrate_file_public_path'] = 'http://ddev-migration-drupal7-web';

$settings['migrate_file_private_path'] = '';
The value of the migrate_source_connection setting should match the name of the database connection pointing to Drupal 7. At the start of this section we named it migrate for our example project.
For migrating public files, we have two options: (a) either a fully qualified domain name of the Drupal 7 site to fetch the files from, or (b) a path to a folder in the same server with a copy of the user uploaded files.
Private files are by definition not web accessible. Therefore, if you need to migrate private files, they need to be copied to the server where the Drupal 10 migration will be executed.
We are going to expand on file migrations in a future article. For now, we want to point to this section of the official documentation on troubleshooting file migration errors in case you encounter issues.
Automated migration using the Migrate Drupal UI module
Drupal Core includes the following migration related modules:
- Migrate: consists of the core API that can be used to import data from any source.
- Migrate Drupal: allows connecting to a Drupal 6 or 7 site to import configuration and content.
- Migrate Drupal UI: exposes an admin user interface for the Migrate Drupal module. This will allow us to perform the automated migration from the browser.
To get started, let’s execute the following commands from the root of our example repository to get a Drupal 10 site running:
cd drupal10

ddev start

ddev composer install

ddev drush --yes -v site:install minimal

ddev launch

ddev drush uli
Let’s break down the group of commands. First it will download Core and other module dependencies via Composer. Then it installs Drupal using the minimal installation profile. As the name suggests, this is the minimal setup required to run a Drupal project. As discussed in article 4, for the migration we want a site with as little configuration as possible and no content at all. The last command will give you a link to log in as an administrator. The Drupal 10 site will be available at https://migration-drupal10.ddev.site/. Have you ever seen a Drupal site like this? :-)
To continue with the minimalistic motif, let’s enable only the three migration modules mentioned at the beginning of this section. You can navigate your way to the Extends page available at /admin/modules or run the following command:
ddev drush --yes pm:enable migrate migrate_drupal migrate_drupal_ui
This will enable four modules. Wait, what?! Weren’t we enabling three modules? Where did this fourth module come from? Glad you asked. Starting in Drupal 10.1, Migrate Drupal declares a dependency on the Password Compatibility (phpass) module. Refer to this change record for more details on why this is needed and when the extra module can be uninstalled. In a nutshell, a new password hashing algorithm was introduced and the phpass module allows old passwords from Drupal 7 to continue to work.
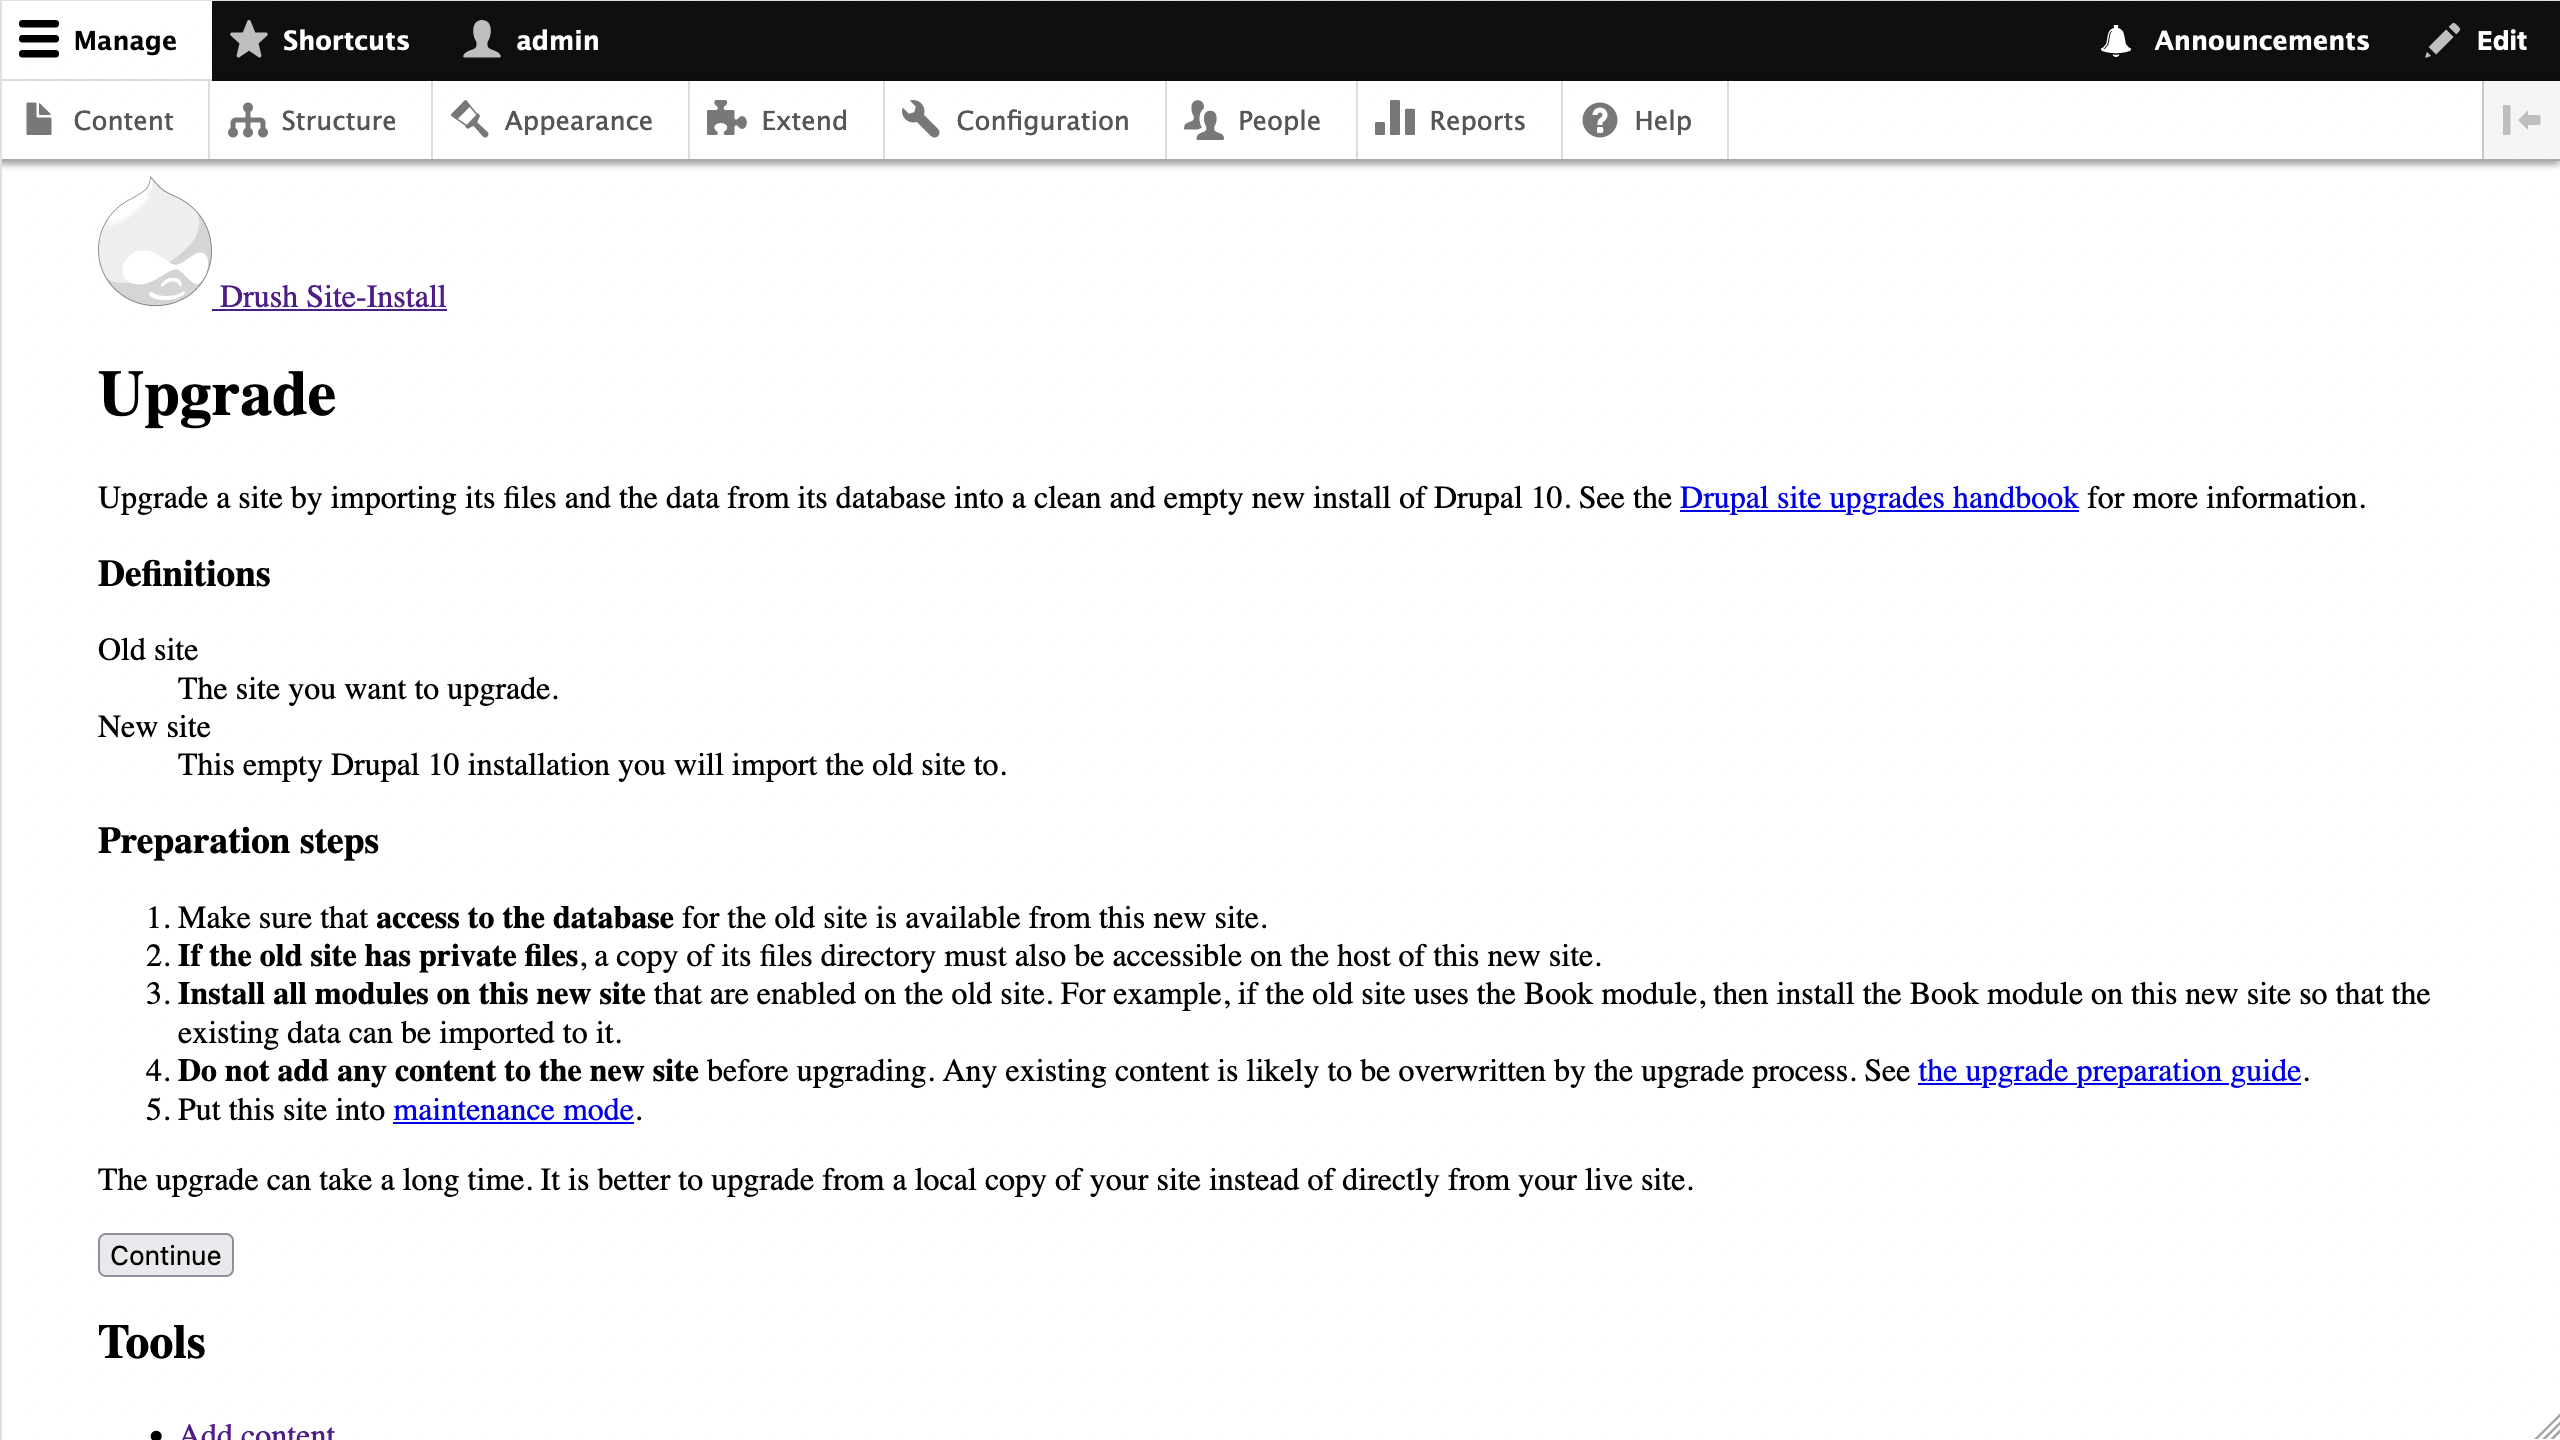
With the migration modules installed, let’s make our way to the upgrade form available at /upgrade.
You will be greeted by links to the official documentation and preparation steps. Read the instructions carefully and click on the Continue button.
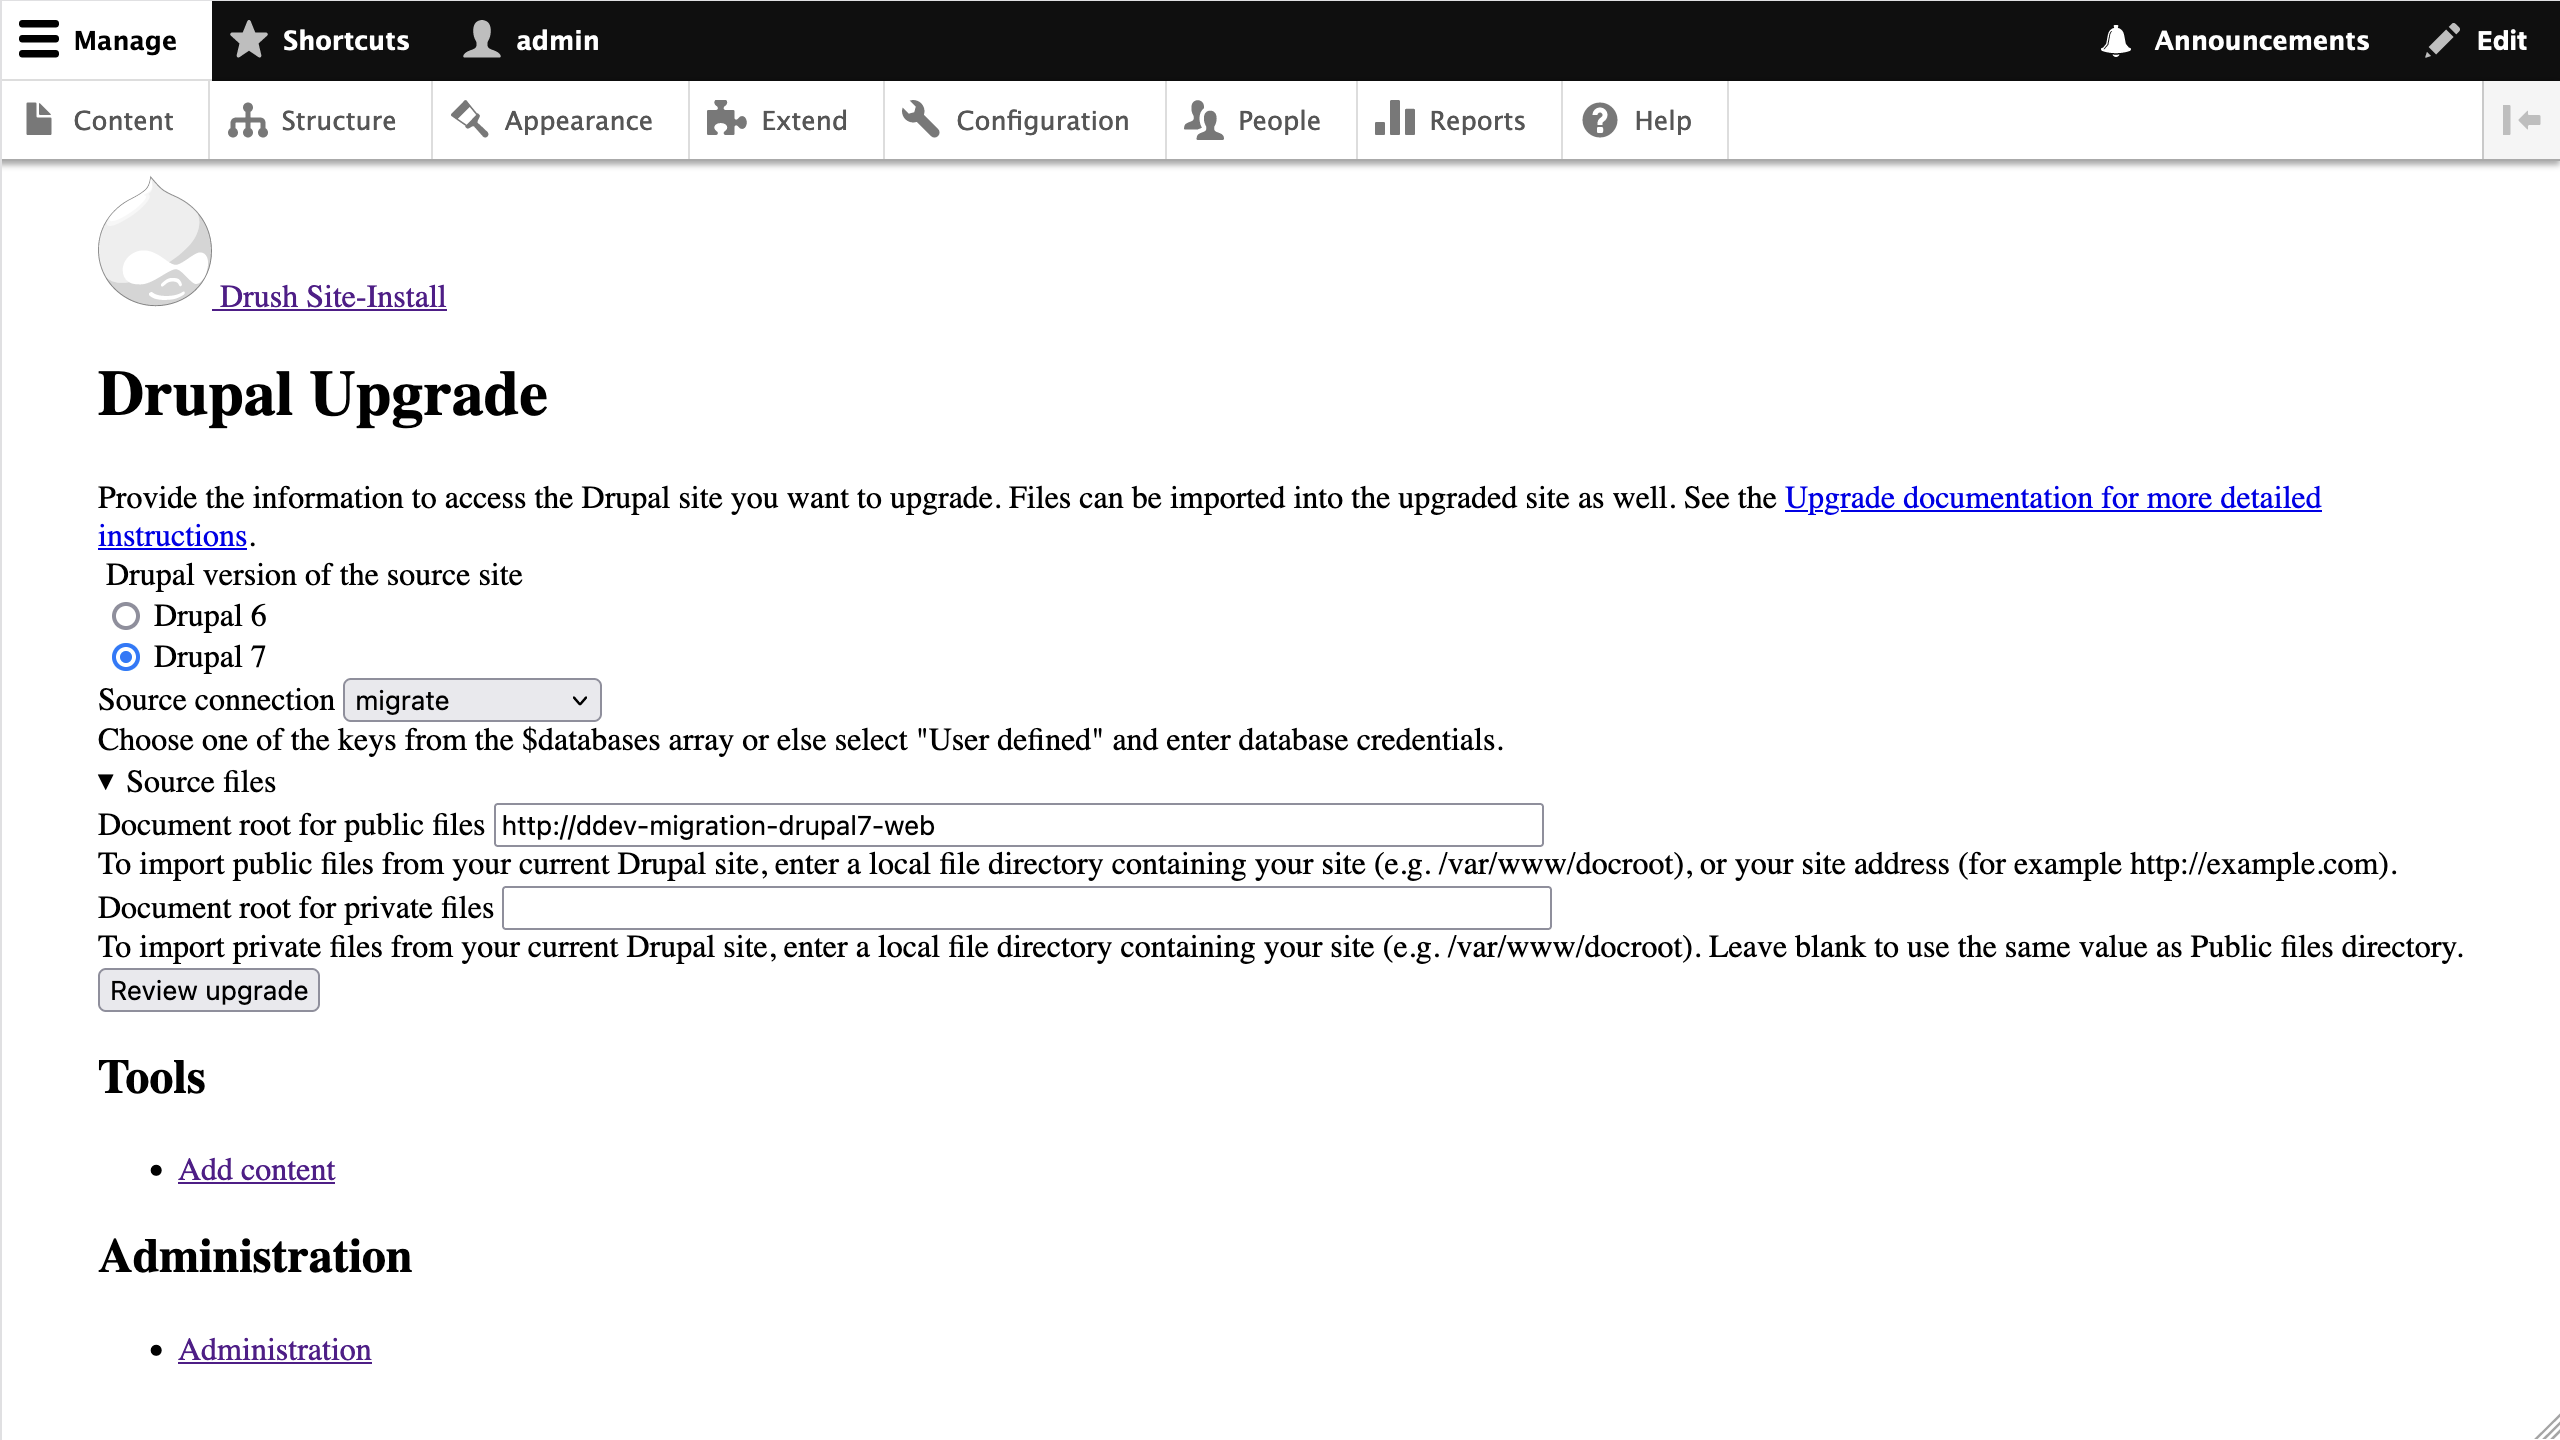
The second step of the wizard will ask you to indicate which version of Drupal you intend to migrate from, the source database credentials, and the location for the public and private files.
In our example project, the form should be filled out already with the details provided in settings.migrate.php. These are the four settings we explained at the end of the previous section. If you are using a different setup, fill out the form manually. Then, click the Review upgrade button.
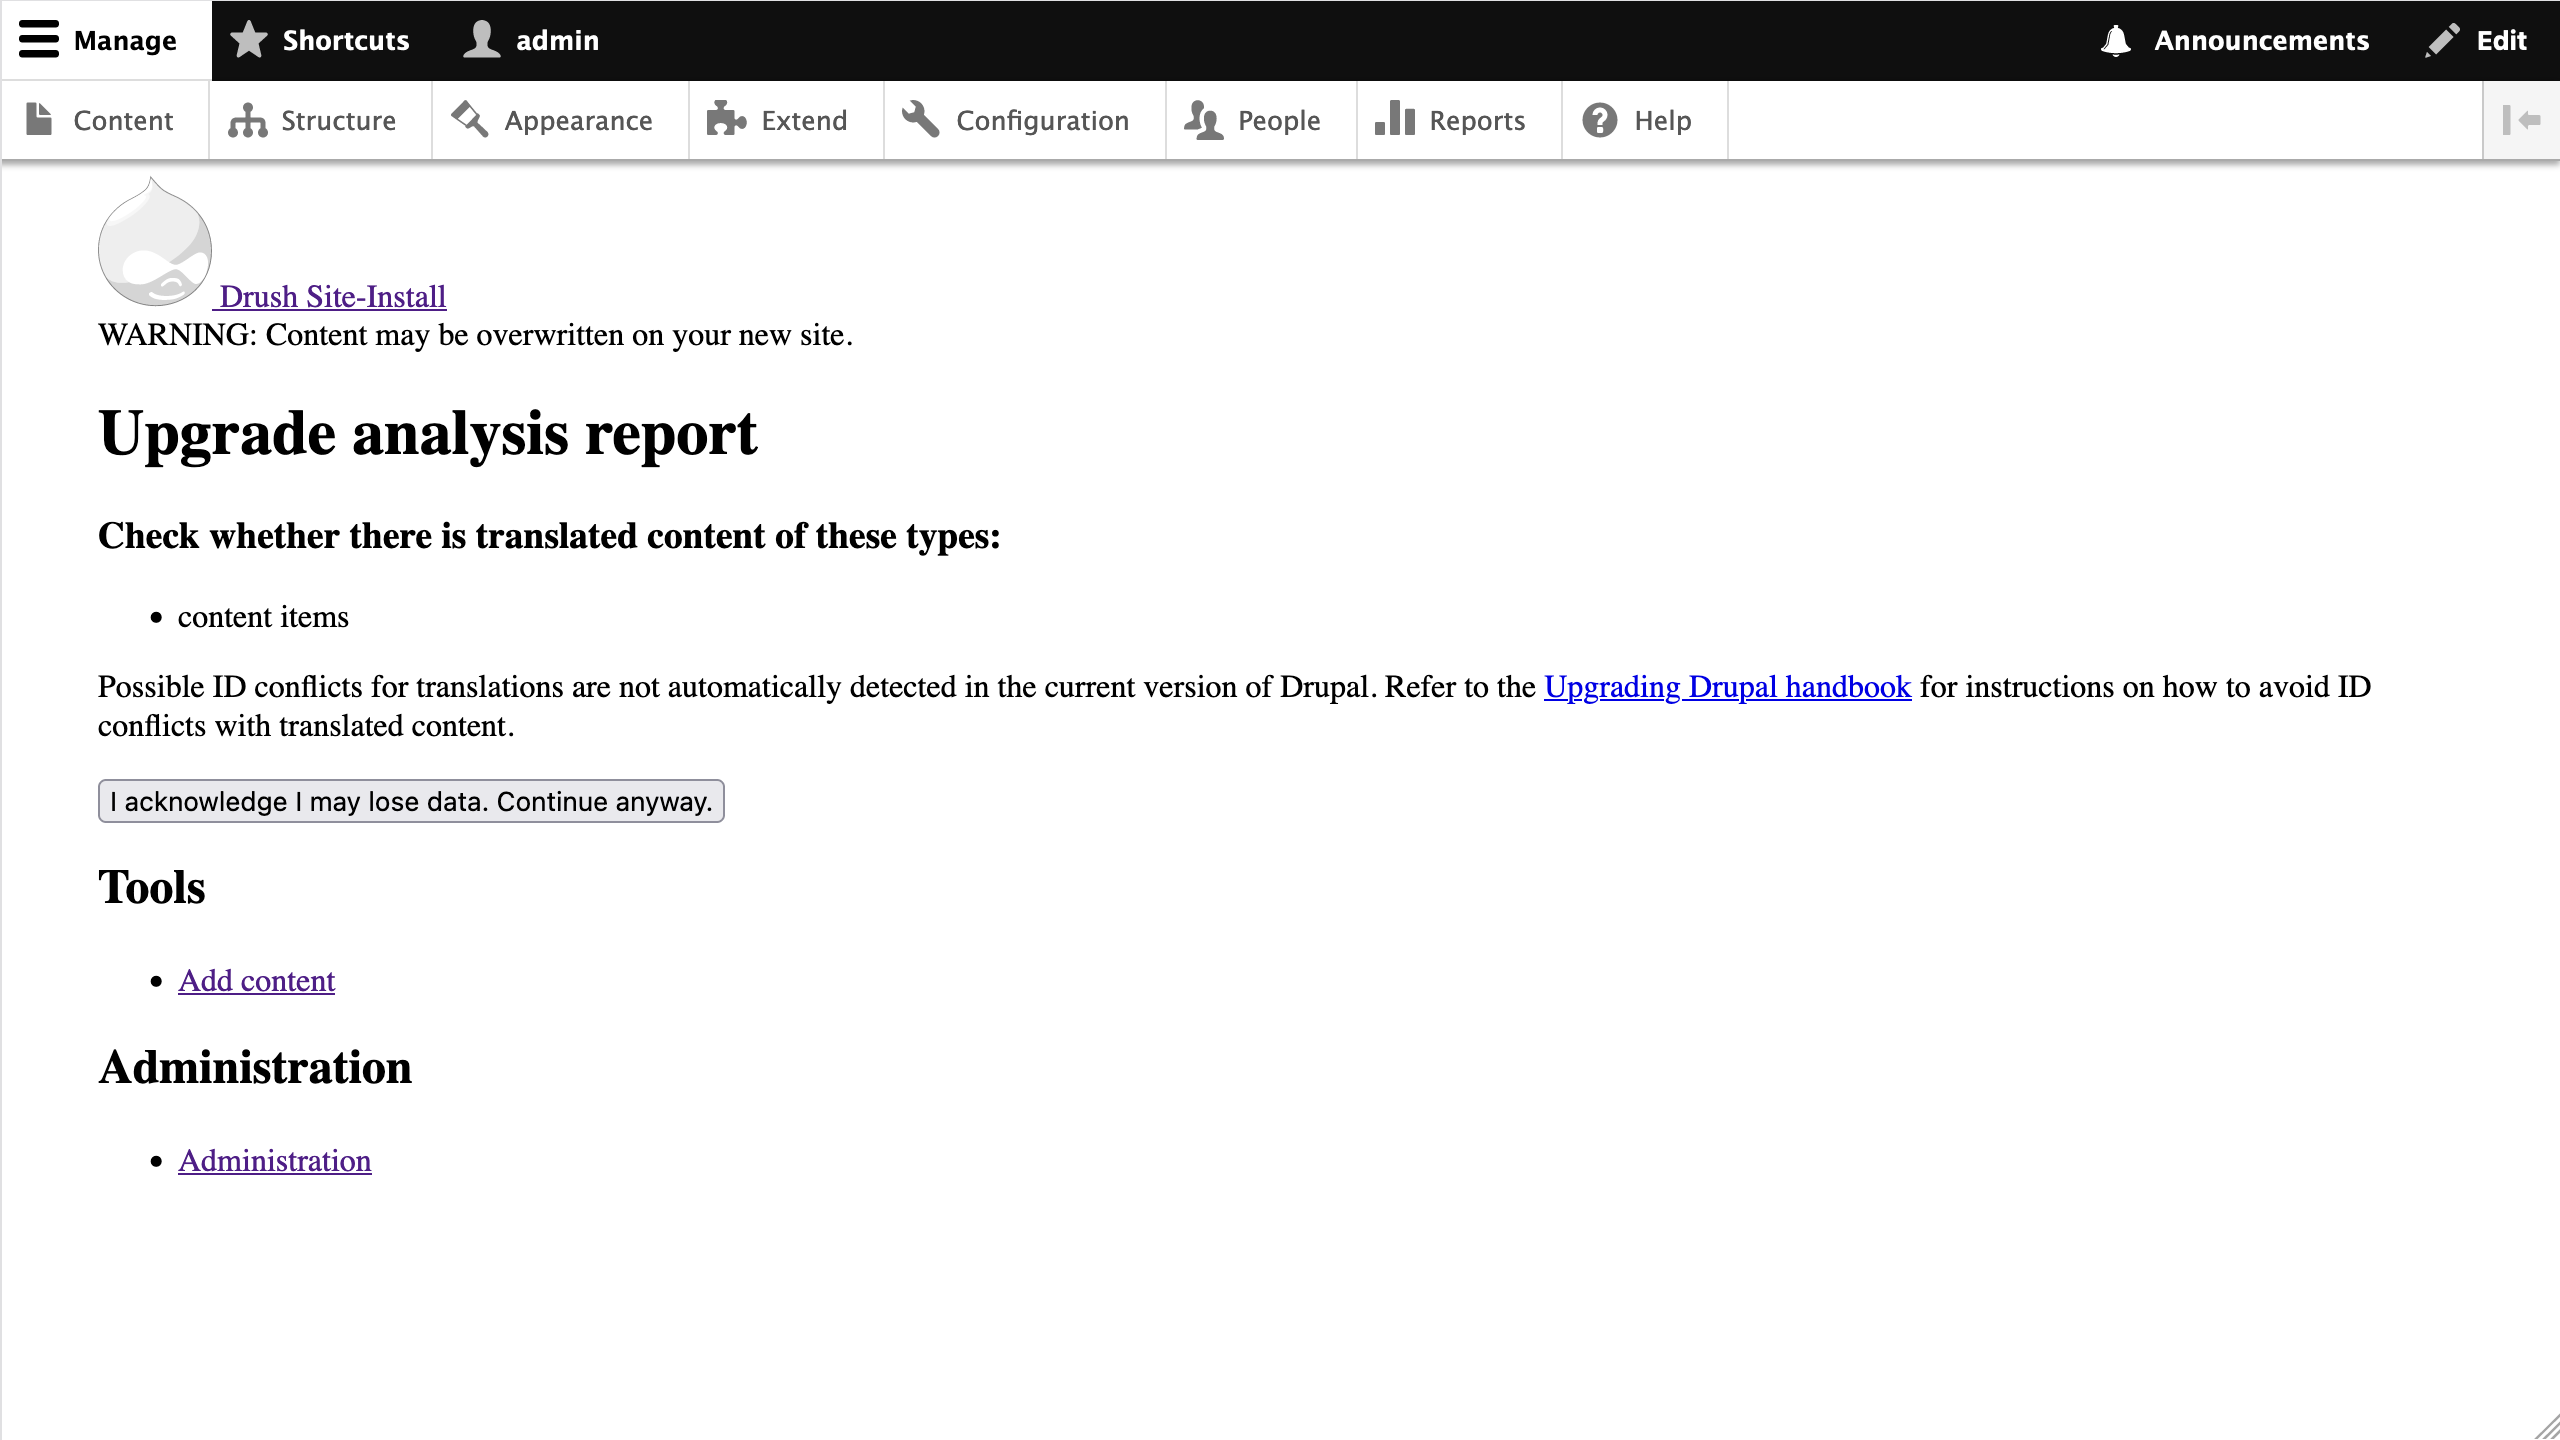
A possible third step in the wizard is a page titled “Upgrade analysis report.” There are two conditions that would make this make appear: (a) you (or a module) have created content on the site that might get overridden by the migration, or (b) the Content Translation module is enabled.
In the second scenario, it might be a false positive that is explained in this Core issue. If you stumble upon this warning, verify that there is no content of any entity type that could be overridden. If that is the case, click the I acknowledge I may lose data. Continue anyway. button.
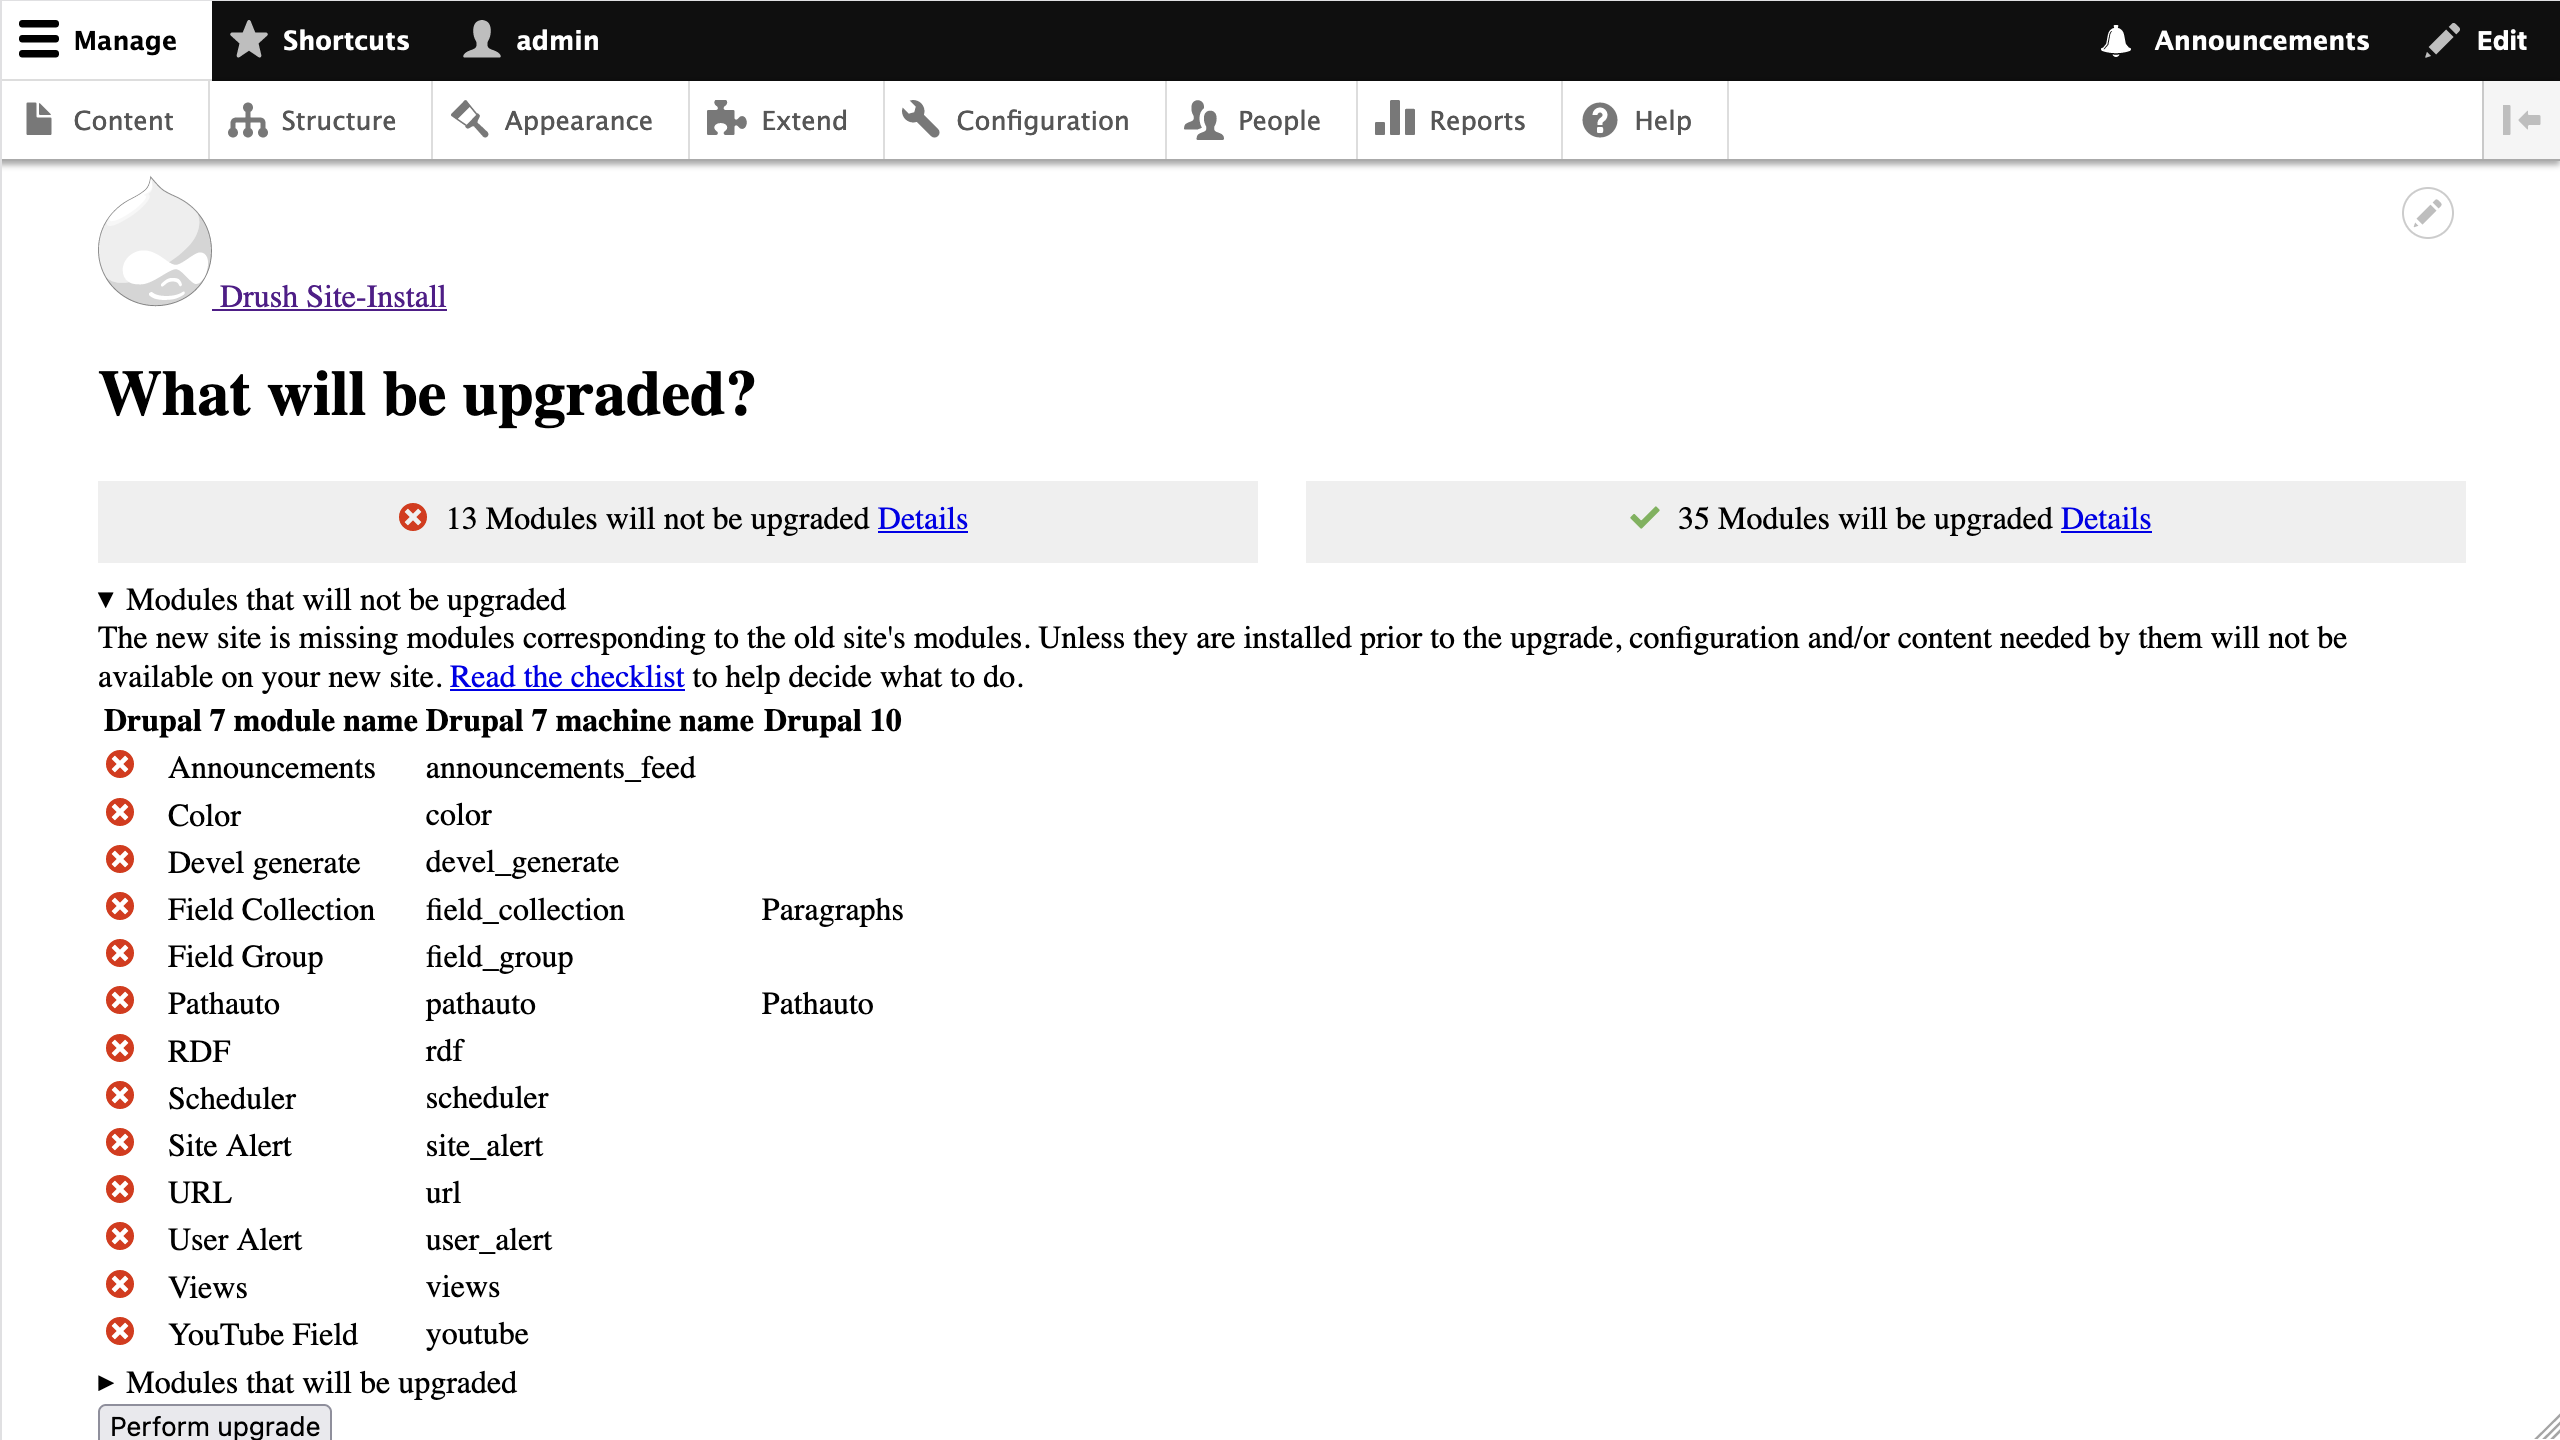
Then, you should land on a page titled “What will be upgraded?” To assemble this report, Drupal reads the modules that are enabled in the source and destination sites. The system will read every module enabled in Drupal 7 and check Drupal 10 modules that attempt to provide an automated upgrade path. We talked about this in article 4. Refer back to that article for more details on the automated migration.
For now, let me remind you to take this report with a grain of salt. Some modules that say they cannot be automatically migrated will, in fact, be migrated. And the opposite is also true. :-)
Technical note: To build this report data from a Drupal 10 module's *.migrate_drupal.yml file and available migration plugins will be used to decide the migration status for each enabled Drupal 7 module. Check the ReviewForm class in the Migrate Drupal UI module to see how the functionality is implemented.
To proceed with the example, let’s install many more modules:
ddev drush --yes pm:enable address announcements_feed automated_cron big_pipe block block_content breakpoint ckeditor5 config contact contextual datetime dblog dynamic_page_cache editor entity_reference_revisions field field_group field_group_migrate field_ui file filter help history image link media media_library menu_link_content menu_ui mysql node options page_cache paragraphs path path_alias pathauto shortcut social_link_field system taxonomy telephone text token toolbar update user views views_ui
After doing so, refresh the page and you will see that the number of modules that (allegedly) can be automatically migrated will increase. And in the list of modules that appear not to have an automated migration, you will see modules like field_collection that will in fact be migrated to paragraphs automatically.
For now, let’s proceed by clicking the Perform upgrade button.
Because we enabled the dblog module before performing the automated upgrade, you can go to Reports :: Recent log messages (/admin/reports) to read messages logged during the process. Pay particular attention to errors and warnings.
After doing so, have a look at the site to see how much content and configuration was possible to import automatically. In my experience, the results vary greatly from project to project. A common source of problems is Drupal 7 fields that do not have corresponding Drupal 10 versions. Because the field migrations happen relatively early in the process, errors in them might prevent subsequent migrations to work properly.
Even with an incomplete migration, the steps we took in this article have let us peek behind the curtain of the automated approach. We learned about settings that affect the migration process and some of its limitations. In the next article, we will execute an automated migration from the command line and explain how to leverage this option to create custom migrations.