Series Overview & ToC | Previous Article | Next Article
In the previous article, we learned to apply Drupal recipes to add configuration to our Drupal 10 site. Today, we are going to continue this process to bring in more configuration related to text formats and editors, user roles, and user fields. We will explain the reasons why recipes are used instead of migrations and provide guidelines for running an automated migration in your own projects if needed.
Applying text format and editor recipes
Our example Drupal 7 site was installed using the standard installation profile and made no customizations to text formats. Moreover, it did not use contributed modules to provide a WYSIWYG editor. We could use the upgrade_d7_filter_format to migrate the text formats and manually add editor configuration afterwards. Instead, we will apply recipes that come with Drupal core to add text formats already configured with an editor.
From the Drupal 10 folder in your host machine, run the following commands:
ddev drush recipe core/recipes/basic_html_format_editor
ddev drush recipe core/recipes/restricted_html_format
ddev drush recipe core/recipes/full_html_format_editor
If things go as expected, you will see messages indicating that the recipes were applied successfully. Otherwise, refer to the previous article for information on troubleshooting recipes application.
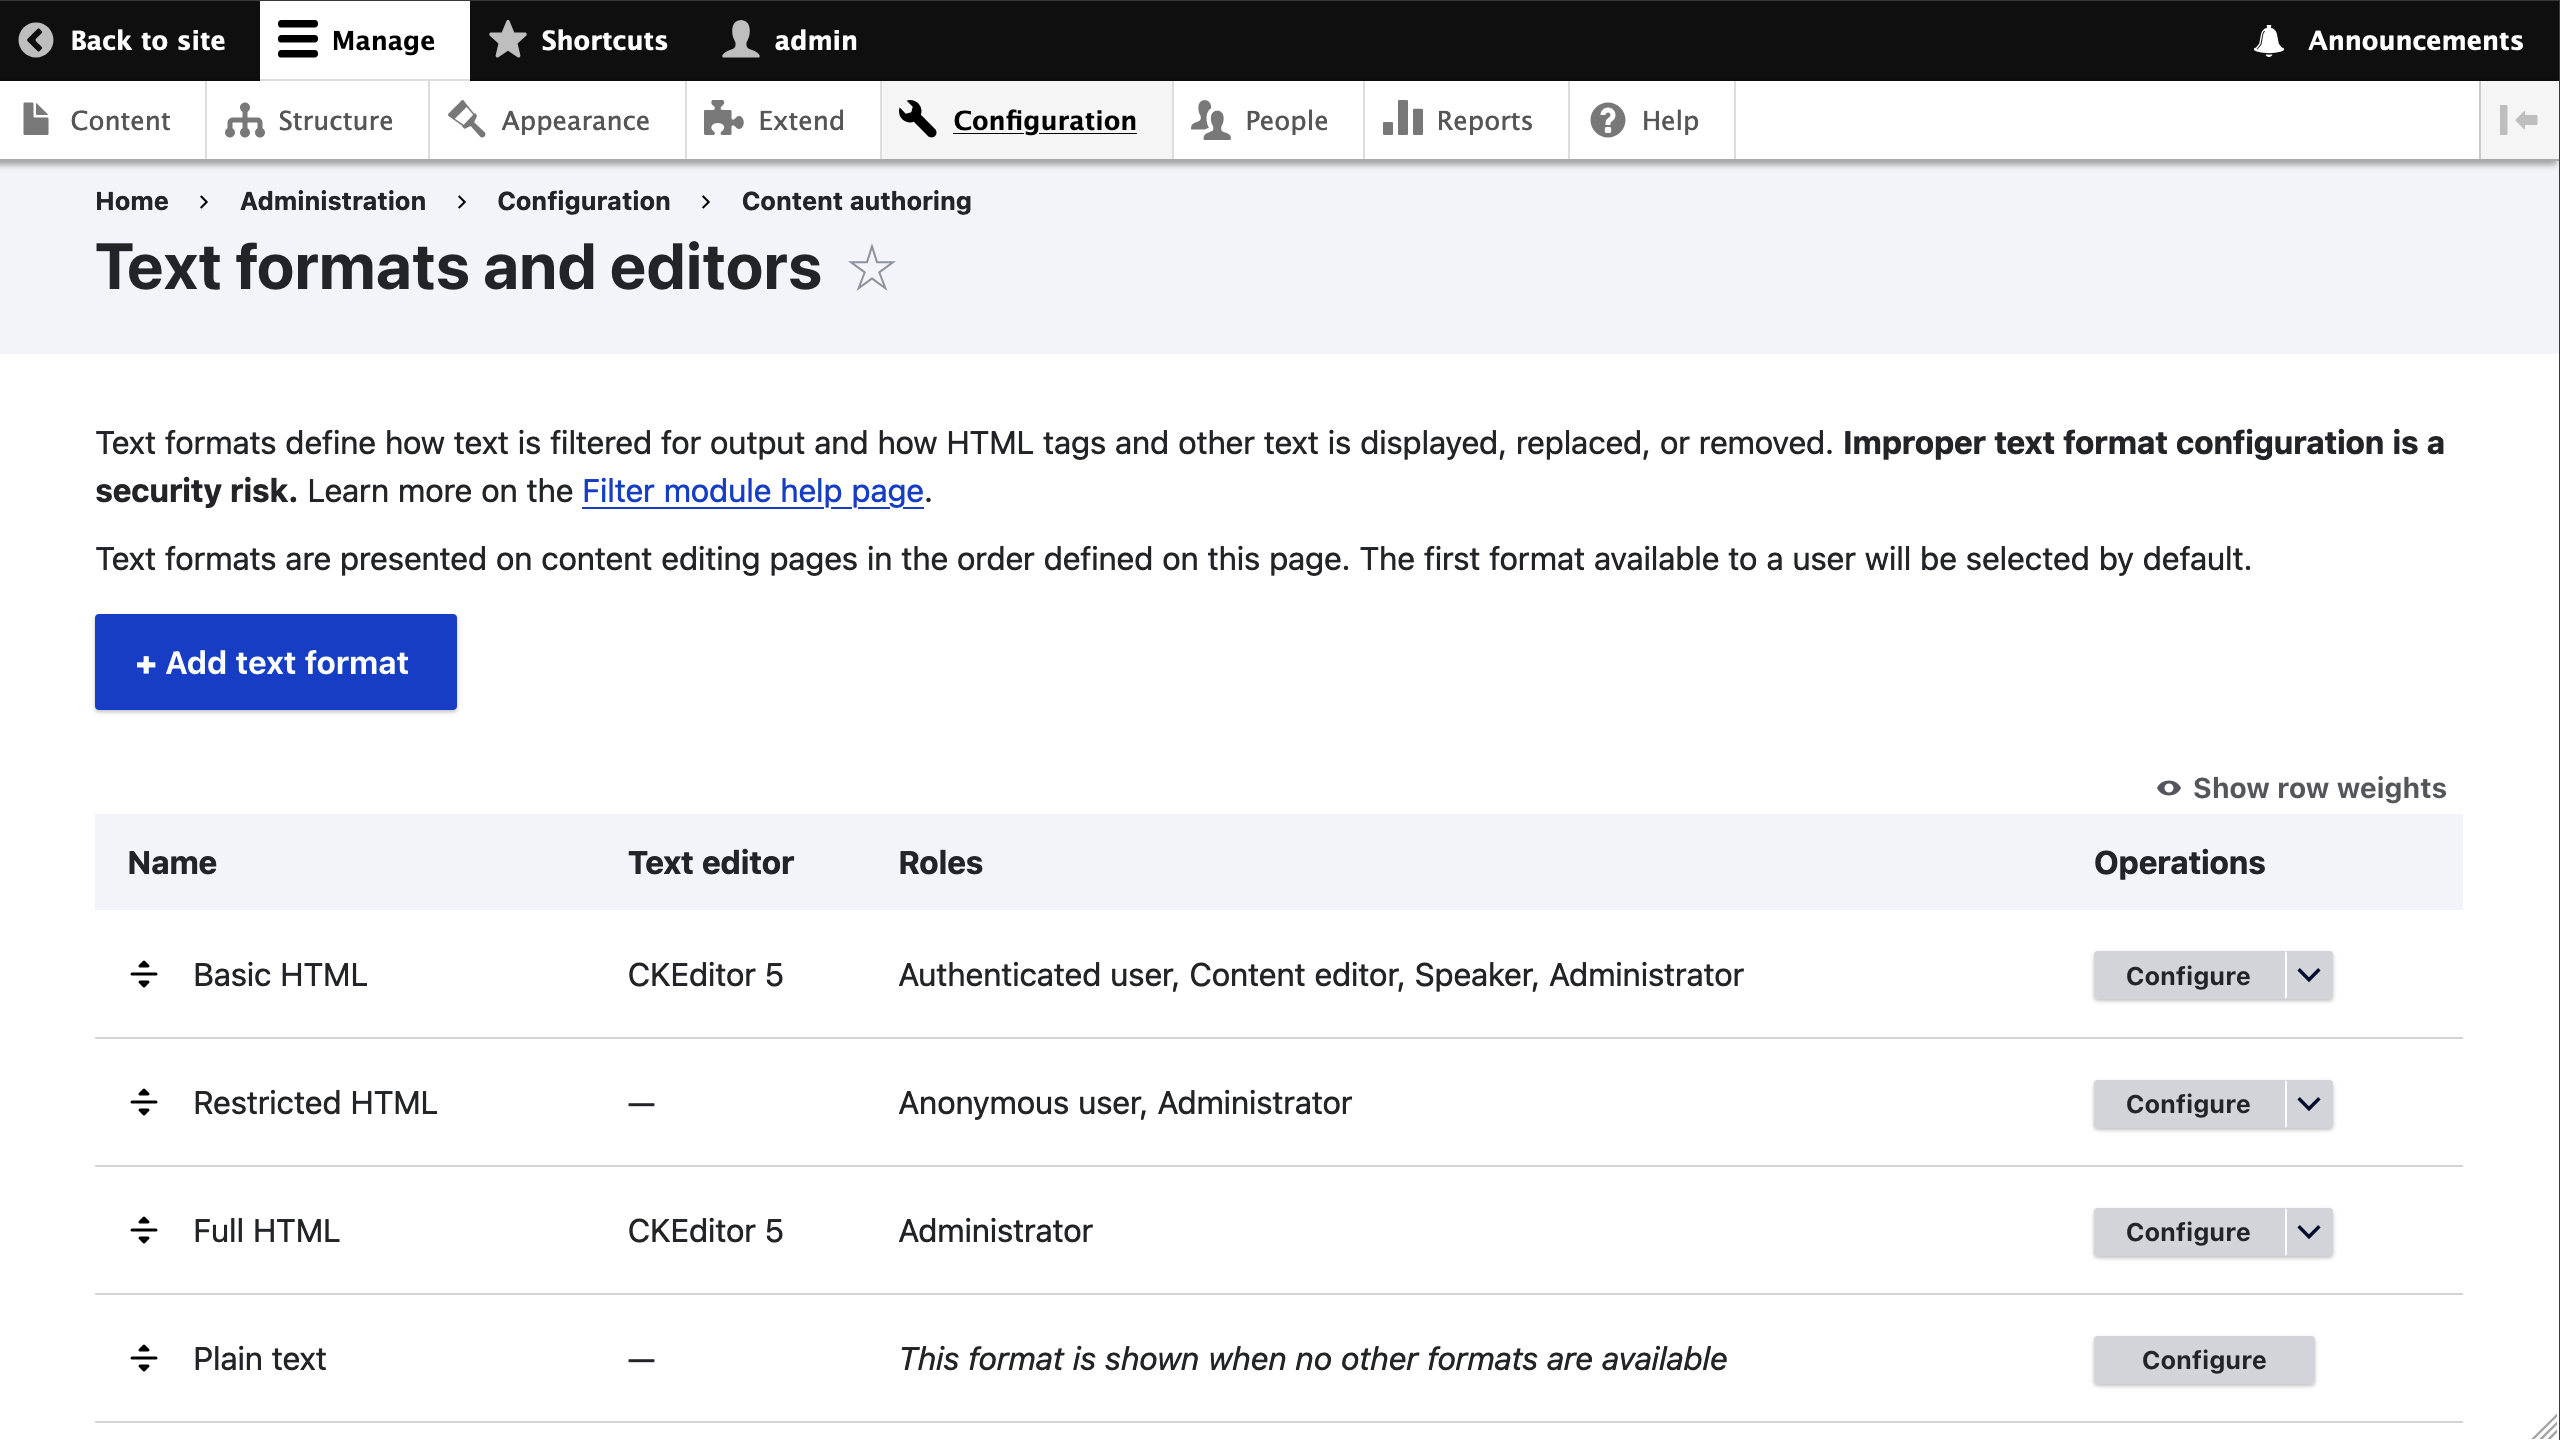
The basic_html_format_editor recipe creates the basic_html text format, a corresponding editor configuration, and grants the authenticated user role access to the new text format. The restricted_html_format recipe creates the restricted_html text format, no editor configuration, and grants the anonymous user role access to the new text format. The full_html_format_editor recipe creates the full_html text format, a corresponding editor configuration, and no changes to user roles or permissions. In addition to these three text formats that were created, the plain_text text format already existed. You can see the results at https://migration-drupal10.ddev.site/admin/config/content/formats

Note: The image above includes additional roles that are created in the next section.
In Drupal 7, the available text formats are: plain_text, filtered_html, and full_html. As part of the content migrations, filtered_html will be mapped to basic_html. The other two will be migrated to their counterparts in Drupal 10.
If you had custom text formats, the upgrade_d7_filter_format would take care of migrating them. Their text filter configuration will also be migrated provided equivalent Drupal 10 plugins exist for those used in Drupal 7. The upgrade_d7_filter_format migration uses the filter_id process plugin to allow mapping text filters between both versions of Drupal. In our case, we decided to go with the new defaults in Drupal 10 and map text format values as needed.
Applying user role recipes
The standard installation profile in Drupal 7 gives us three roles: anonymous user, authenticated user, and administrator. In addition to these, we added a fourth one: Editor.
In Drupal 10, we get four roles out of the box: anonymous, authenticated, administrator, and content_editor. The first two are present in our existing site. We are going to apply recipes to add the last two. Later on, we will do the corresponding mapping of roles from Drupal 7 to 10.
Technical note: The roles that are initially available depend on how the site was originally installed. Our example project uses a custom installation profile named tag1_profile, modeled after the minimal installation profile. The profile depends on the node module, which itself depends on the user module. When enabled, the user module provides the anonymous and authenticated roles via the module’s required configuration. If a site is installed using the umami installation profile, the administrator role is also created via the profile's required configuration. The standard installation profile, on the other hand, creates both the administrator and content_editor roles via the profile's required configuration. Note that both umami and standard include definitions for the anonymous and authenticated roles to assign permissions they have access to.
From the Drupal 10 folder in your host machine, run the following commands:
ddev drush recipe core/recipes/administrator_role
ddev drush recipe core/recipes/content_editor_role
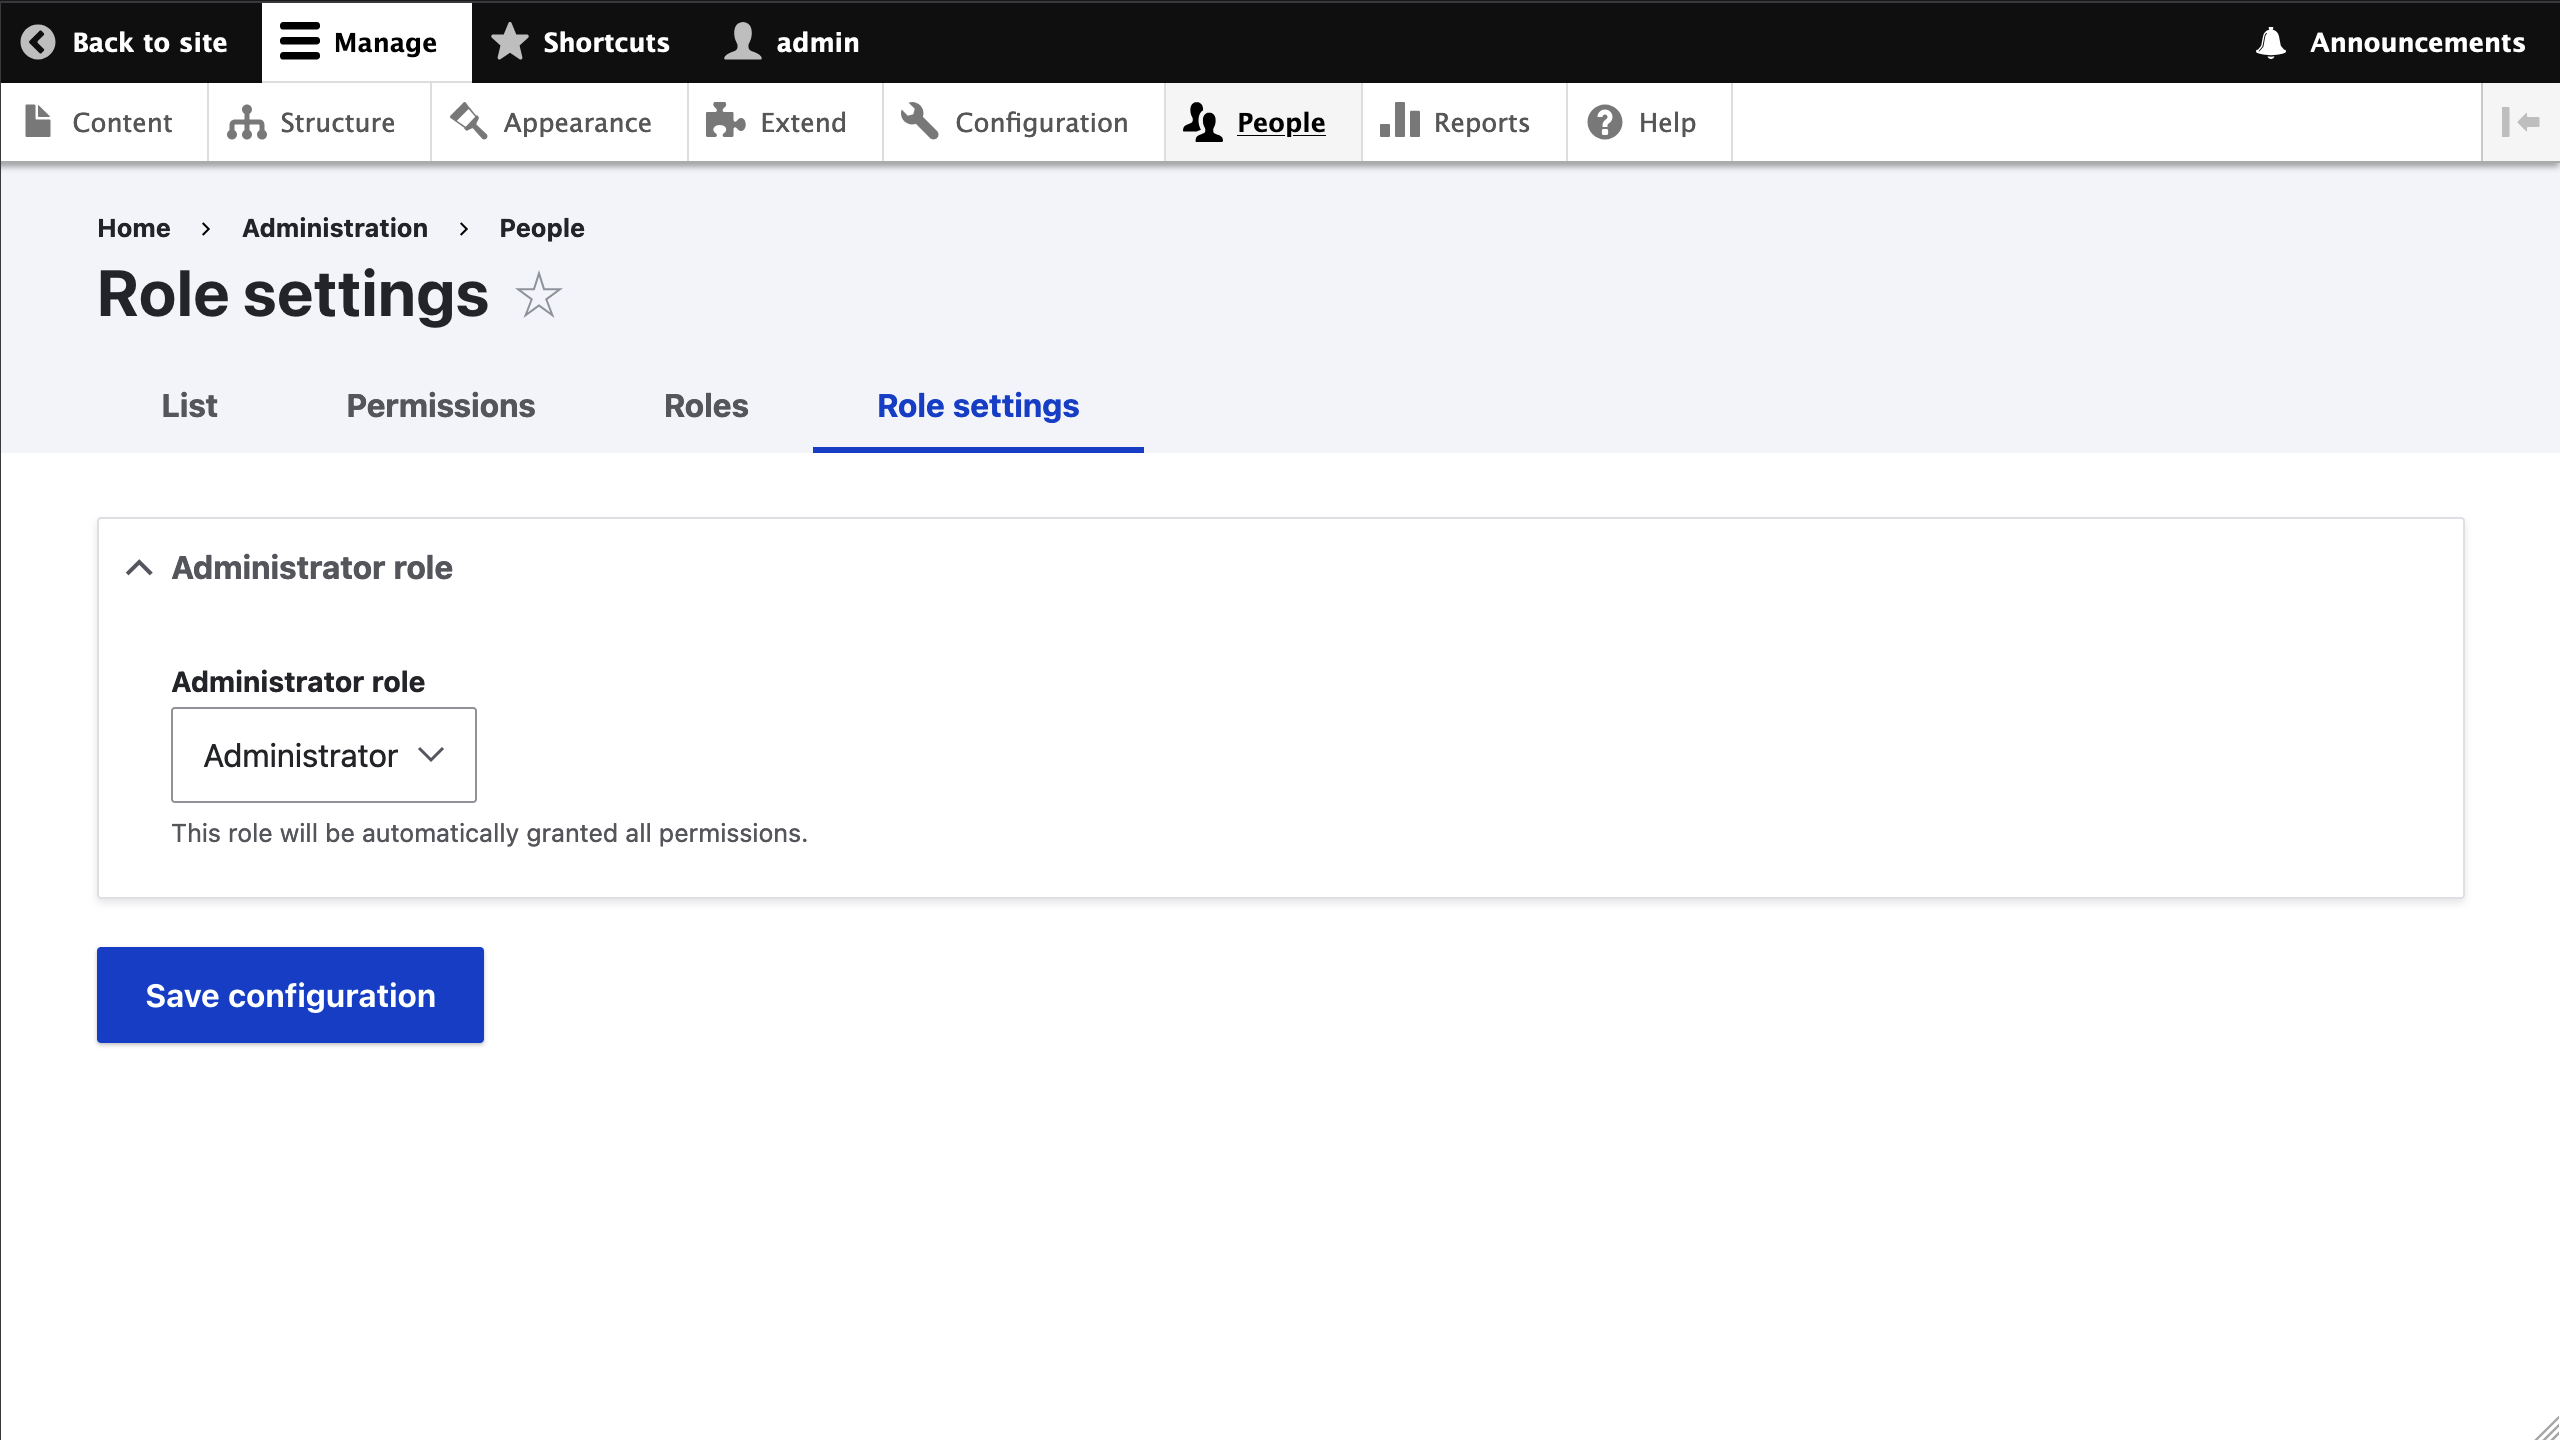
If the recipes apply cleanly, we should see two new roles at https://migration-drupal10.ddev.site/admin/people/roles The first one is the Content editor role with permission to use the administration pages and view own unpublished content. The second one is the Administrator role with all permissions granted. The latter automatically receives all current and future permissins as determined by the Role settings page at https://migration-drupal10.ddev.site/admin/people/role-settings

At this point you might be wondering, why are we using recipes instead of a migration to import roles and permissions? Because our example is very simple and it adds little value to run a migration. Remember that the automatic migration is trying to provide (to the extent possible) a verbatim copy of the configuration and content that existed in Drupal 7. That is not desired in most real life projects. You might want to drop outdated functionality, take advantage of new Drupal 10 features, or change the site’s architecture.
The fact the migrations are generated automatically does not mean that you need to execute them all. As we have seen so far, and will continue to do, we will cherry pick and customize the migrations that are relevant to accomplish the goals set in our migration plan.
If you want to run the role migration nonetheless, or have a project with a lot of custom roles, run the upgrade_d7_user_role from the ref_migrations folder. Keep in mind that running this migration will replace all permissions already assigned to Drupal 10 roles with only those present in Drupal 7. This is generally not an issue because configuration migrations happen early on. If you are using a custom approach, be mindful that the user role migration should be executed before assigning permissions manually.
The upgrade_d7_user_role migration does two things:
- Creates Drupal 10 user role configuration entities based on the Drupal 7 role names. It is worth noting that in Drupal 7, roles were identified by a numeric role id. In Drupal 10, roles are identified by a machine name string. The migration will create the machine name based on the name value from Drupal 7.
-
Try to migrate permissions. In both versions of Drupal, permissions are identified by strings, but their value can vary greatly for the “same permission”. For example, the
edit terms in 1permission in Drupal 7 would be the equivalent of theedit terms in tagspermission in Drupal 10. For context, vocabularies in Drupal 7 were identified by numeric ids while machine name strings are used in Drupal 10. In order to account for changes in permission names, theupgrade_d7_user_roleprovides a static map of old permissions to new ones. We could manually update this map if necessary. Depending on how many roles and permissions are in place, it might be easier and faster to manually update the permissions in Drupal 10 after all roles are created in the new site. At the end of this process, export the new configuration and commit the changes.
Technical note: Drupal 10 migrations that create user role entities will check for invalid permissions which would be removed before being assigned to a role. In this context, an invalid role is one whose Drupal 7 name, after the mapping mentioned above, does not match an existing Drupal 10 role. The migration will log a message for each role that contains invalid permissions. Refer to this change record for more information.
Below is the output of executing ddev drush migrate:messages --format=yaml upgrade_d7_user_role after running the user role migration in our example project:
-
 level: '2'
 source_ids: '3'
 destination_ids: administrator
 message: "Permission(s) 'access all views', 'access dashboard', 'administer field collections', 'administer fieldgroups', 'administer fields', 'administer youtube', 'block IP addresses', 'delete revisions', 'delete terms in 1', 'edit field collections', 'edit terms in 1', 'revert revisions', 'use ctools import', 'view revisions' not found."
-
 level: '2'
 source_ids: '4'
 destination_ids: editor
 message: "Permission(s) 'create speaker content', 'create sponsor content', 'delete any speaker content', 'delete any sponsor content', 'delete own speaker content', 'delete own sponsor content', 'delete revisions', 'delete terms in 1', 'delete terms in 2', 'edit any speaker content', 'edit any sponsor content', 'edit own speaker content', 'edit own sponsor content', 'edit terms in 1', 'edit terms in 2', 'revert revisions', 'view revisions' not found."
While on the topic of roles and permissions, let's do the following configuration changes manually:
- Add a
Speakerrole. This role will be assigned to users that are created fromSpeakernodes in Drupal 7. - Update the
Speakersfield in theSessioncontent type to only allow referencing users with theSpeakerrole we just created. - Update the
Basic HTMLtext format so that it can be used by theContent editorandSpeakerroles.
Other permissions will be assigned to different roles to mimic the configuration from Drupal 7. This is a site building exercise readers can do on their own. Refer to the example repository for the final set of permissions.
Adding fields to user accounts
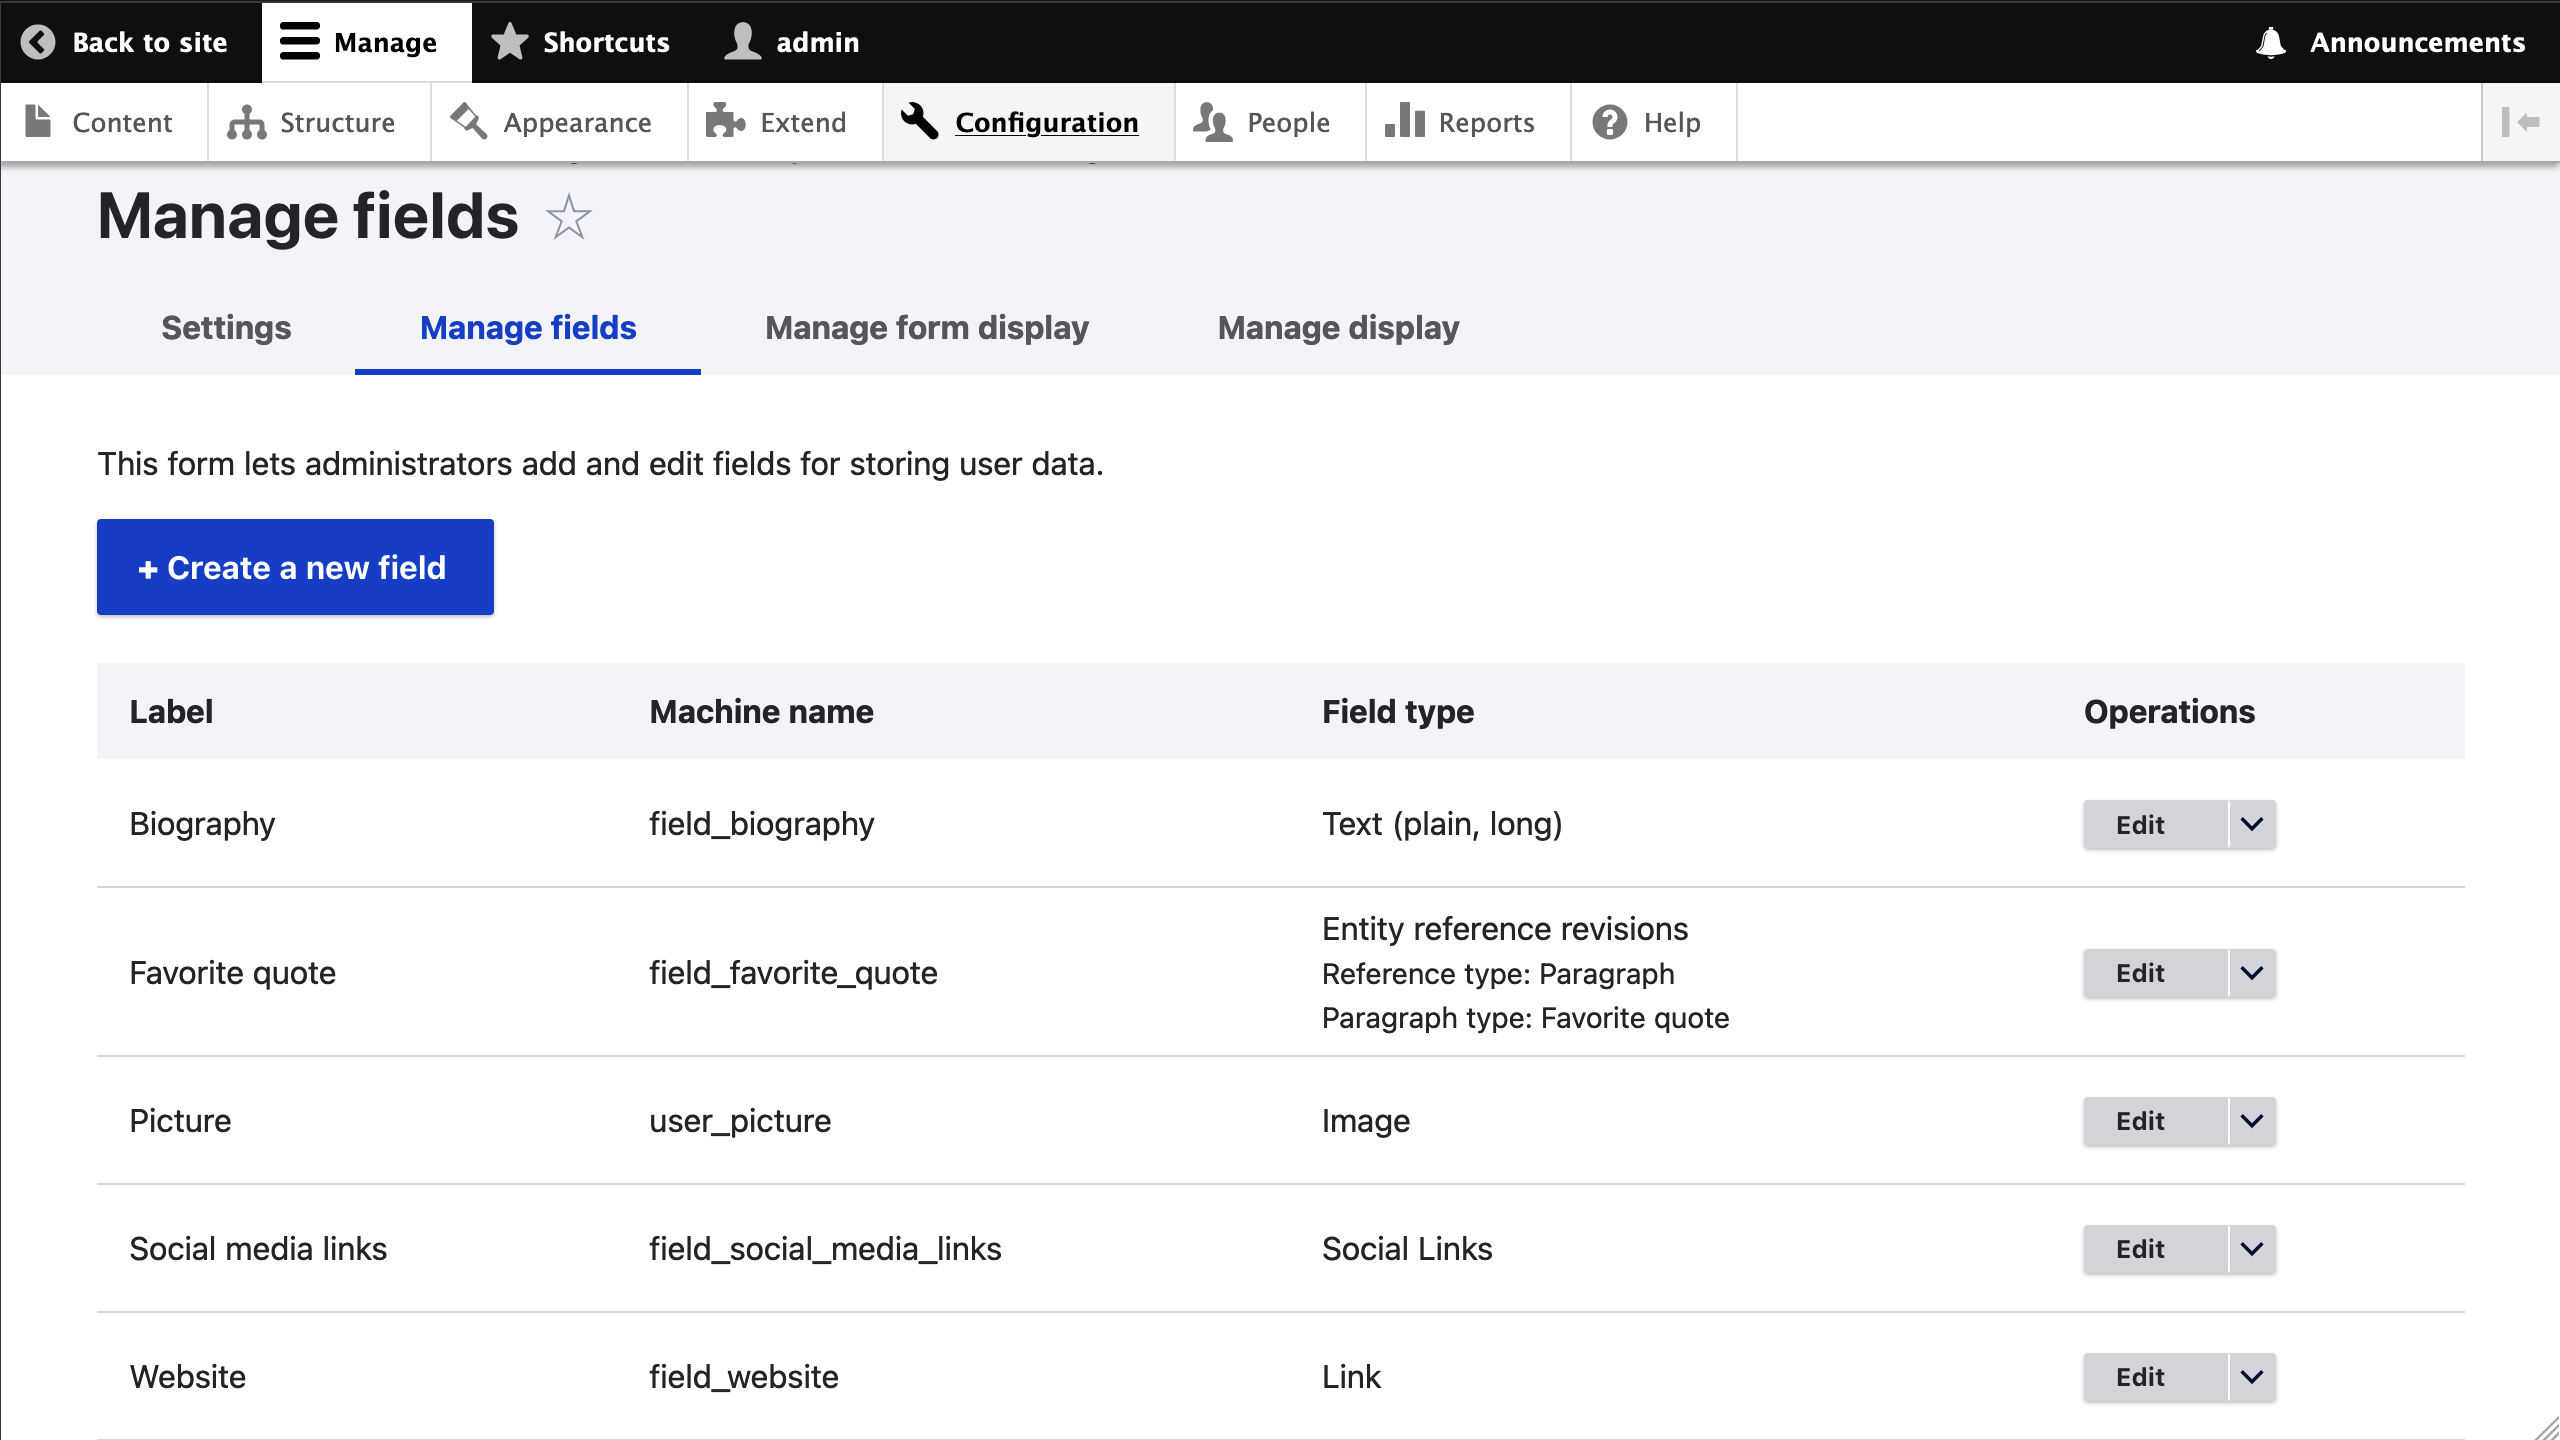
Back in article 8, we determined that Drupal 7 nodes of type Speaker will be migrated as user entities in Drupal 10. To accomplish this content model change, we need to add fields so that user accounts can store data previously present in nodes. The interface to add fields to the user entity is available at https://migration-drupal10.ddev.site/admin/config/people/accounts/fields The fields to add are:
- A
User picturefield of typeFile upload > Image. - A
Biographyfield of typePlain text > Text (plain, long). - A
Favorite quotefield of typeParagraphs. This will store a reference to paragraphs of typeFavorite quote. - A
Social media linksfield of typeSocial Links. This field type is provided by the Social Link Field module which is already available on the site. - A
Websitefield of typeLink. Only external links should be allowed and the link text should be disabled.
For the User picture field apply the user_picture recipe: ddev drush recipe core/recipes/user_picture. All other fields should be created manually. None of them is required. All except for the Social media links field should have a cardinality of one, that is, the allowed number of values should be limited to one. In the case of the Social media links field, set the cardinality to unlimited and allow the following platforms: Drupal User Profile, LinkedIn, and X (Twitter).
Refer to the example repository for the final field configuration including widget and formatter settings. Below is an image of the fields that were added to the user entity:

We have seen that there are multiple ways to bring configuration into a new Drupal 10 site:
- running an automatic migration
- applying recipes
- manually creating configuration from the administration interface
Remember to always strike a balance among the different options. As an anecdote, I worked on a Drupal 7 migration for a media outlet that contained over 150 image styles. In this case, it made sense to automate their migration. I created a custom process plugin to convert the image effects configuration provided by the ImageCache Actions Drupal 7 module into image effect plugins provided by the Image Effects Drupal 10 module. I used techniques similar to the ones described in this video presentation to do the mapping between the both versions of Drupal.
In the ref_migrations folder, you will find more migrations related to configuration. They will have the Configuration migration tag. Feel free to have a look at them and continue exploring on your own. For the purpose of our example, the current state of the configuration suffices to accomplish our goals:
- understand the process of migrating configuration
- have an updated content model we can migrate into
In the next section, we will explain how to adapt content migrations to match the site’s structural changes.

