

Series Overview & ToC | Previous Article | Next Article
This step-by-step series has covered a lot of ground on planning and preparing for a Drupal 7 to Drupal 10 migration. Today, we start putting that knowledge into practice by automatically migrating content types. First, we will execute a migration to pull all content types in Drupal 7. Then, we will customize the migration to remove unnecessary content types. Finally, we will learn how a separate node title label migration also affects content type configuration in Drupal 10.
Prerequisites
For this section, we are going to switch to the start branch in the repository. This will contain the basic project set up for the Drupal 7 and Drupal 10 sites, but no migrations. You can always refer to the main branch for the final version of the examples. If you have not done so, clone the repository and switch to the start branch.
git clone https://github.com/tag1consulting/d7_to_d10_migration.git d7_to_d10_migration
git checkout start
Moving forward, we will be executing migrations to migrate data from Drupal 7 into Drupal 10., This process requires both environments to be running. Refer to Article 8 -Example repository setup and Drupal 7 site audit - for an explanation on how to set up the Drupal 7 site and Article 9 - Performing an automated migration - for an explanation on how to set up the Drupal 10 site.
For reference, use the commands below to get both sites up and running.
For Drupal 7:
# From the root of the repository.
cd drupal7
ddev start
# See article 7 for importing the database and files.
ddev launch
ddev drush uli
For Drupal 10:
# From the root of the repository.
cd drupal10
ddev start
ddev composer install
# Install the site from existing configuration
ddev composer si
ddev launch
ddev drush uli
The ddev composer si is a custom Composer script that drops the current Drupal 10 database and installs the site from the existing configuration. Run this command before proceeding with today's example. Once the site is installed, there is no need to execute this command again unless otherwise instructed. The custom script is defined in the root composer.json file as such:
"scripts": {
    "si": "drush --yes sql:drop && drush --yes -v site:install tag1_profile --existing-config"
},
Migrating content types
In Drupal 10, content types are configuration entities. Back in Article 1- Getting to Know Your Migration, we mentioned that migrating configuration automatically makes sense when there are little or no configuration changes compared to Drupal 7. Our example will include a significant number of content model changes. To account for that, we could create all the configuration manually and only automate the migration of content. Instead, we will cherry-pick and customize the automated migration of a subset of Drupal 7's configuration. After automating part of the process, we will manually create or update configuration in Drupal 10 to reflect the desired content model.
We learned how to generate automatic migrations in article 10, and we talked about code organization for a custom migration project in article 11.As mentioned previously, we will use a tag1_migration_config module to store configuration migrations and related code. To do so, copy the upgrade_d7_node_type migration from the reference folder into our custom module and rebuild caches for the migration to be detected.
cd drupal10
cp ref_migrations/migrate_plus.migration.upgrade_d7_node_type.yml web/modules/custom/tag1_migration/tag1_migration_config/migrations/upgrade_d7_node_type.yml
ddev drush cache:rebuild
Note that while copying the file, we also changed its name and placed it in a migrations folder inside our custom module. This was discussed in Article 11 - Customizing the generated migration as part of the changes to convert a migration configuration entity to a Core migration plugin. After copying the file, make the following changes:
- Remove the following keys:
uuid,langcode,status,dependencies,field_plugin_method,cck_plugin_method, andmigration_group. - Add two migration tags:
node_typeandtag1_configuration. - Add
key: migrateunder thesourcesection.
For an explanation of these changes, refer back to article 11. After the modifications, the file should look like this:
id: upgrade_d7_node_type
class: Drupal\migrate\Plugin\Migration
migration_tags:
  - 'Drupal 7'
  - Configuration
  - node_type
  - tag1_configuration
label: 'Node type configuration'
source:
  key: migrate
  plugin: d7_node_type
  constants:
    preview: 1
process:
  type:
    -
      plugin: get
      source: type
  name:
    -
      plugin: get
      source: name
  description:
    -
      plugin: get
      source: description
  help:
    -
      plugin: get
      source: help
  title_label:
    -
      plugin: get
      source: title_label
  preview_mode:
    -
      plugin: get
      source: constants/preview
  display_submitted:
    -
      plugin: get
      source: display_submitted
  new_revision:
    -
      plugin: get
      source: options/revision
  create_body:
    -
      plugin: get
      source: create_body
  create_body_label:
    -
      plugin: get
      source: body_label
  third_party_settings/menu_ui/available_menus:
    -
      plugin: static_map
      bypass: true
      source: available_menus
      map:
        main-menu: main
        management: admin
        navigation: tools
        user-menu: account
  third_party_settings/menu_ui/parent:
    -
      plugin: static_map
      bypass: true
      source: parent
      map:
        'main-menu:0:': 'main:'
        'management:0:': 'admin:'
        'navigation:0:': 'tools:'
        'user-menu:0:': 'account:'
destination:
  plugin: 'entity:node_type'
migration_dependencies:
  required: {  }
  optional: {  }
Executing the content type migration
Drupal migrations are a two step process. You first write the migration plugin and then you execute it. As discussed in Article 11 - Customizing the generated migration, migrations can be written as Drupal Core plugins or as configuration entities using Migrate Plus. As for executing them, there are multiple migration runners. The most commonly used are Drush and the Migrate Tools module. Both options provide commands to execute migrations from the command line.
Migrate Tools also provides a user interface to run migration configuration entities from a web interface. See this Migrate Tools issue discussing support for Core plugins in the administration interface.
Technical note: The commands provided by Drush core and Migrate Plus are mostly the same. There are flags that are only present in one or the other. See this issue to learn about some differences between the two.
Migrate Tools provides extra functionality like shared configuration, which we will not implement. We do not need a web interface for running migrations and that feature does not currently support Core migration plugins. Therefore, we will use Drush to run the migrations from the command line throughout the whole series.
Execute the following commands to make sure our content type migration is being detected properly.
cd drupal10
ddev drush migrate:status upgrade_d7_node_type
You should see that there are eight records to process. Those correspond to the eight content types present in Drupal 7. You can see them at https://migration-drupal7.ddev.site/admin/structure/types
If the command fails saying Invalid migration IDs: upgrade_d7_node_type, make sure that the tag1_migration_config module is enabled and that the upgrade_d7_node_type.yml file is placed in the migrations folder inside the module. The full location within the repository should be drupal10/web/modules/custom/tag1_migration/tag1_migration_config/migrations/upgrade_d7_node_type.yml
If the command does not return any output other than table headers, it means it is not possible to connect to the Drupal 7 database. Make sure the Drupal 7 DDEV site is running and that a connection string named migrate exists in settings.ddev.php. See article 9 - Performing an Automated Migration - for details on setting up a database connection string.
Now, let's execute the migration. Moving forward, it is assumed that the commands are executed within the drupal10 folder at the root of the example project repository.
ddev drush migrate:import upgrade_d7_node_type
You should see that eight items were processed. The report should also indicate that eight items were created—content types in this case. You can see the migrated content types at https://migration-drupal10.ddev.site/admin/structure/types
Customizing the content type migration
In Article 8 - Example repository setup and Drupal 7 site audit, we drafted a lightweight migration plan. We specified that three content types from Drupal 7 would not be migrated to Drupal 10:
- Nodes of type
speakerwill be migrated asuserentities. - Nodes of type
sponsorwill be migrated astaxonomy termentities. - Nodes of type
swagwill not be migrated and the content type will be dropped altogether.
These content model changes are also reflected in the source site audit document discussed in Article 3 - Source Site Audit - An In depth Analysis and populated in Article 8 - Example repository setup and Drupal 7 site audit.
Now we need to update the migration to prevent the three content types listed above from being migrated. Identify the following lines in the upgrade_d7_node_type migration:
process:
  type:
    -
      plugin: get
      source: type
And change them to:
process:
  # @modified
  type:
    -
      plugin: skip_on_value
      source: type
      value:
        - speaker
        - sponsor
        - swag
      method: row
      message: 'Content type not needed in new site.'
As discussed before, the migrate API will fetch and process one record at a time. In this case, we are processing content types. For each Drupal 7 content type, the d7_node_type source plugin will populate the type source property with the machine name of the content type.
Using the skip_on_value process plugin, we prevent content types from being imported if their machine name matches one of the array elements defined in the value configuration option. We skip the whole record from being processed by setting method: row. Additionally, we set a custom message to explain the reason why the content type was skipped.
It is important to know what process plugins are provided by Drupal core and contributed modules like Migrate Plus. There are many operations that can be performed without writing custom code. During the series, we explain those relevant to customizing the migrations in the example project , but we recommend researching what is available on your own. Refer to the 31 days of migration series for examples and explanations on the use of various process plugins. We also encourage you to review the previous article, which explains in more detail the syntax of migration files and the process pipeline.
If we were to run the migrate:status command now, we would see that eight records had been imported and that there are 0 unprocessed records. If we were to run the migrate:import command, you would see that no items are processed. Instead of doing either, execute the following commands:
# Rollback the migration. Removes all previously imported content types.
ddev drush migrate:rollback upgrade_d7_node_type

# Rebuild caches. This makes changes to the migration file to be detected.
ddev drush cache:rebuild

# Import the migration again. This time, only a subset of the content types will be migrated.
ddev drush migrate:import upgrade_d7_node_type

# Check the messages related to this migration.
ddev drush migrate:messages upgrade_d7_node_type

# Check the status of this migration.
ddev drush migrate:status upgrade_d7_node_type
Let’s break down these commands.
First, we rollback the upgrade_d7_node_type migration. This removes the content types that were previously imported. Rolling back a migration does not always result in deleting the imported entities. For example, when reverting a node translation, the primary entity might remain in the system. Also, the deletion of entities can be queued to be performed at a later time. We will highlight the cases when rolling back a migration does not result in the immediate deletion of the entity.
Because we are using Drupal core migration plugins, we need to rebuild caches for our changes to the file to take effect. Alternatively, during development we could set the discovery_migration cache bin to cache.backend.null. This was discussed in Article 11 - Customizing the generated migration as a way to bypass the need to rebuild caches. Throughout the series, we will be explicit as to when the migration cache is cleared and will rebuild caches manually.
Then we execute the migration again using the migrate:import command. This time you will see that out of the eight processed items, five were created and three were ignored. With the migrate:messages command we can check that records with Source ID(s) speaker, sponsor, and swag have no Destination ID(s). This means that those records were not imported into Drupal 10. The Message column should contain a familiar message: "Content type not needed in new site."

Technical note: The Level column in the migrate:messages command is populated by a call to \Drupal\migrate\MigrateException::getLevel(). Possible values are constants in the \Drupal\migrate\Plugin\MigrationInterface whose name starts with MESSAGE_. An error is stored as 1, a warning as 2, a notice as 3, and an informational message as 4.
Finally, we execute migrate:status to verify there are no pending records to process. It is possible to restrict how many records to import by using the --limit flag of the migrate:import command or by dynamically altering the migration query to add a range. Unless you are manually limiting the number of records to process, you should see 0 unprocessed records.
A number other than 0 usually indicates a problem somewhere in the migration:
- If the number is positive, it is possible that the source plugin's configured ID columns are not unique.
- Another option for a positive value is that the column used as a highwater property is not unique.
- If negative, it usually means that records in Drupal 7 have been deleted since the last time the migration was executed. In this case, deleting a content type in Drupal 7 after we execute this migration would result in a negative number.
At this point, there should be 5 content types in the Drupal 10 site. Except for the body field attached to the Article (article) and Basic page (page), no other field has been added to any content types. Migrating fields require four different migrations which will be discussed in future articles.
Those paying very close attention will notice there is a setting in the Venue content type in Drupal 10 that does not match the corresponding Drupal 7 value. That is, the label of the title field. In Drupal 7, it is Name while in Drupal 10 it is Title.
Migrating node title labels
That brings us to migrating node title labels. There is a separate migration for importing the label for node titles: upgrade_d7_node_title_label. Copy it from the reference migrations folder into our custom module and rebuild caches for the new migration to be detected:
cd drupal10
cp ref_migrations/migrate_plus.migration.upgrade_d7_node_title_label.yml web/modules/custom/tag1_migration/tag1_migration_config/migrations/upgrade_d7_node_title_label.yml
ddev drush cache:rebuild
After copying the file, make the following changes:
- Remove the following keys:
uuid,langcode,status,dependencies,field_plugin_method,cck_plugin_method, andmigration_group. - Add two migration tags:
base_field_overrideandtag1_configuration. - Add
key: migrateunder thesourcesection.
Now, execute the migration:
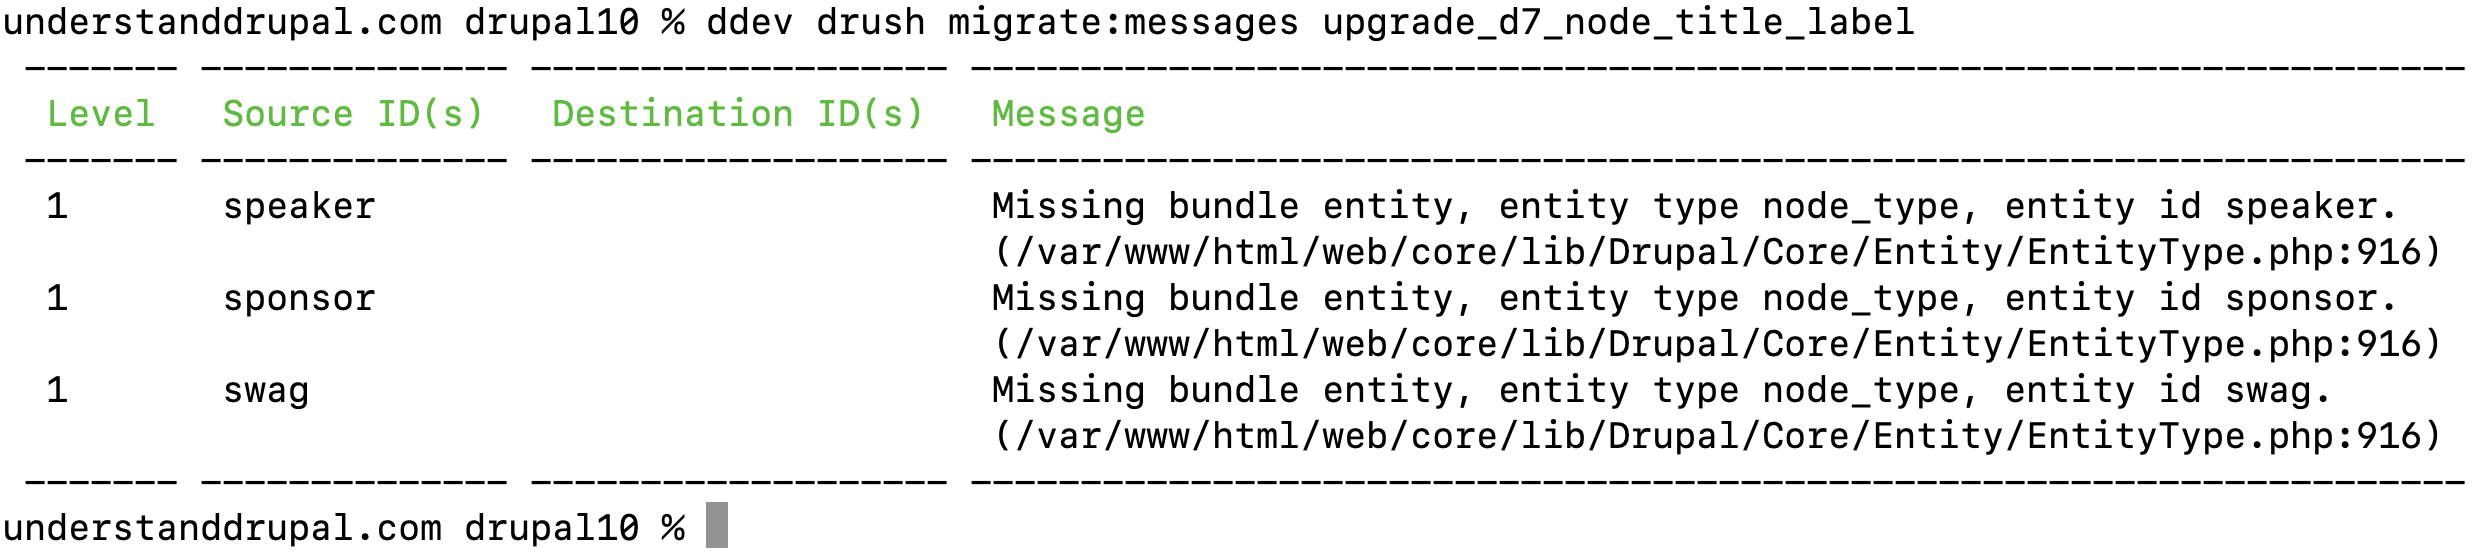
ddev drush migrate:import upgrade_d7_node_title_label
You should see the following notice in the console: Processed 8 items (1 created, 0 updated, 3 failed, 4 ignored). There will also be this error: upgrade_d7_node_title_label migration: 3 failed. The eight items correspond to the eight content types from Drupal 7. For each of them, the migration will fetch the Drupal 7 content type label and create a base_field_override configuration if it differs from the default Title value. The 1 created corresponds to the Venue content type. If you go to https://migration-drupal10.ddev.site/admin/structure/types/manage/venue, the Title field label shall now be set to Name just like in Drupal 7. The 3 failed correspond to the three content types that were skipped in the upgrade_d7_node_type. If the content type does not exist in Drupal 10, it is not possible to override the title label. The 4 ignored corresponds to other four content types that were migrated: Article, Basic page, Event, and Session. Because they use Title as the Title field label, there is no need to provide a base_field_override configuration for them.
If we execute the ddev drush migrate:messages upgrade_d7_node_title_label command, we will see there are three messages for this migration. The level 1 for Source ID(s) speaker, sponsor, and swag indicate an error as described in the Message column.
What about the four records that were ignored? They are explicitly skipped in the migration:
process:
  label:
    -
      plugin: static_map
      source: title_label
      bypass: true
      map:
        Title: 0
    -
      plugin: skip_on_empty
      method: row
The process pipeline for the label destination property skips the whole row if the source title_label has a value of Title. It first uses the static_map plugin to convert the label Title to the number zero. This is later passed to the skip_on_empty plugin, which treats the zero as an empty value. The whole row is skipped by method: row.
Ideally, everytime we use skip_on_empty or skip_on_value to skip a whole row, we should set the message configuration option. That way, the map table for this migration stores the reason why a row was skipped. See this issue on improving exception messages in process plugins.
In the meantime, because we are customizing the migrations, we could add the message configuration option to the skip_on_empty plugin ourselves. Doing so will be left as an independent exercise for you to do. To give it a try, rollback the migration, add the message configuration, import the migration again, and review the messages.
Technical note: The migrate messages table is truncated when the migration is rolled back. If you execute migrate:messages right after migrate:rollback there will not be any messages. You need to run migrate:import again for messages to appear, when properly configured.
Striking a balance
We added a whole new migration to update the Title field label of the Venue content type. Was that really needed? Probably not. We could have made this change directly in Drupal 10 after the Venue content type was migrated. We did it here to illustrate a point.
Multiple migrations can affect the same concept in Drupal 10. In this case, both upgrade_d7_node_type and upgrade_d7_node_title_label affect how content types are imported. Under the hood, they create different configuration entities, but the point still stands. Another example of this is migration fields which consist of four different migrations: storage, instance, widget, and formatter. We are going to cover field migrations in future articles.
That being said, we need to strike a balance between what to automate and what changes to do manually in Drupal 10. In cases like the above, it will be evident that updating the configuration manually is better. In other cases, like migrating fields, it is beneficial to run an automated migration even if the results are not 100% perfect. Past experience and familiarity with writing custom migrations will go a long way in making the right decision.
In my experience, menus and blocks are rarely migrated automatically. For permissions, an initial automated migration is performed and they are later adjusted manually. For fields, try to migrate as much as possible automatically. In a field migration for a recent project I was able to automate: dropping fields, renaming fields, moving fields from one entity to another, changing field types, changing field widgets/formatters, and more. This required a good amount of customizations, but it was worth doing considering the number of fields to migrate and the content model changes that needed to be applied. Explaining how this was accomplished is outside the scope of this series, but we will touch on some techniques that could be used to perform these and other customizations.
Ultimately, our goal is to teach you how to create custom migrations for your own projects.
What about configuration changes and version control?
We are not going too deep into configuration management nor version control in this series. Those are very important topics to carefully consider in your real life projects. In the interest of brevity, we focus on explaining how to write custom migrations.
That being said, below are some tips for you to consider:
- When executing migrations that create configuration, export that configuration and commit it to the repository.
- When a configuration migration is rolled back and imported again, the
uuidkey of the*.ymlfiles will change. You might want to wait for all/most customizations to be completed before committing the resulting configuration. - If you reinstall the site from the existing configuration, the
_core/default_config_hashvalue will change. Also, the migration map and messages tables will be lost. For configuration migrations, this is acceptable as long as your content migrations do not perform lookups against configuration migrations. We are going to follow this approach during the series. - A single migration can produce multiple configuration entities. In today's example, the
upgrade_d7_node_typemigration created 5node.type.*.ymlconfiguration entities. - When customizing migrations, it is a good idea to commit the generated migration as-is. Then, add the modifications to the migration files as separate commits. This will make it easier to identify what changes were made.
In the next article, we will learn to migrate taxonomy vocabularies and convert Drupal 7 field collections to Drupal 10 paragraphs.
Contact us to learn how we can help you with your migration.
Image by Malcolm Brook from Pixabay